Here's the rest of it! Part 1 of the process went over the trials and tribulations of creating colors from inks and went over color theory to some point. That's irrelevant if you're using existing paints that you want to turn into contrast paints. Mostly. Unless you want to change up the colors. But go read that one if you're interested in my journey.
This is where you turn color into paint. I'm using 'color' to be generic about what is being used - inks, paints, pigments, whatever. Without color you end up with clear and that's not really helpful as a contrast paint.
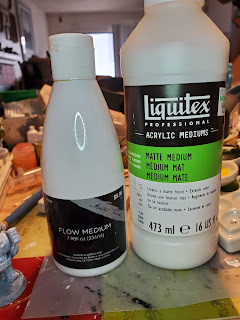
Here's the two artist mediums you use to make paint. Notice I specify that they're artist mediums. You can get very similar things by the craft paint for less money but you get what you pay for. Save yourself headaches (more on that later) and get the artist grade products. Craft store brand is just fine and the stores tend to have coupons. You're not going to use a lot at any given time so it's a wise investment.
- Flow improver
- Matte medium
Flow Improver
This is exactly what it seems to be. This will thin out your mix and extend the drying time (bonus!). It's better than water in the respect that it has .. stuff .. that works with the paint medium instead of just thinning it out. Most of the time water works fine. For this, get some flow improver.
Matte Medium
This is the important one. This makes paint. It makes the resulting blend 'sticky' so it will work as paint. Contrast paints are a heavy wash rather than a true paint so the mixing is going to be different. This is where I had my problems.
Note - don't try to get around this one by using matte varnish. Let me explain why this one caused me a lot of issues because I was stubborn.
When making washes for terrain I like to use matte varnish. It works well enough to make things sticky and it varnishes at the same time. Contrast paint seemed similar enough that I could follow the same process. This is not true. The varnish isn't sticky enough and I couldn't get the viscosity right. That's why I gave up for a while before getting matte medium. Don't make my mistake.
Making Contrast Paint
OK! Here's the good stuff! In the page there's a link to a video that got me started. It's an interesting watch by an interesting creator but I won't double link it. The end result he found was equal parts ink, flow improver, and matte medium.
Well. That sounds simple enough. My confidence was high as I measured out drops.
The results? Not so clear cut.
My problem was viscosity. I didn't have a real bottle of contrast paint to use as a guide for what my end result was supposed to be. If I could only have tried it once I would know where I was having problems. ONCE! Alas with the pandemic situation and the lack of painting groups at my local game stores I didn't have the option to play with someone else's expensive paint.
I honestly didn't know how the paint was supposed to turn out. So I kept testing and testing and testing until I gave up in frustration. Then I sulked and went back to it. I had plenty of primed figures I could use for testing but I never could get it quite right.
I think I may have had it once but didn't paint them correctly so I considered it a failure. Maybe.
I finally gave in and bought the paint. My local game store was very limited in colors so the one I got I'll probably almost never use. I messed up there and should have gone to the store with more selection so I'd have a paint that wasn't so specific. But this store isn't doing great so I gave them the money instead. I'll figure out a use for the paint. Probably. The important thing is I could finally see the viscosity I needed.
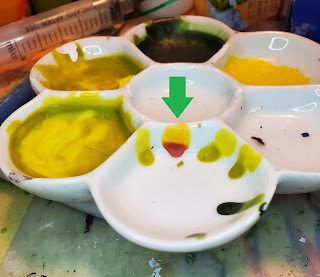
I use my palettes to see how paint will look and react on miniatures. The vertical surface shows viscosity and opacity. If you don't use welled palettes keep a scrap of flat polystyrene for the same purpose. It helps if it's the same color as your standard primer but that's up to you. My helpful painting hint for the day.
The green arrow shows the actual contrast paint. You can see where it covers then creates a pool. That's what I needed. And that's what I got, as you can see from my own results around it.
The problem is that 1:1:1 doesn't work all the time. Color viscosity, climate, and just plain luck play factors in the process. So here's how I experimented to do what needed to be done.
Stupidity note. When I mixed up the bottles of color I added matte varnish and flow improver to them, hoping I could use them right out of the bottle or with very little change. As I stated before I used the wrong thing. But the combination of them made it similar enough to the inks that it worked. After the bottles are empty I'll fill them up with the ink mixes (if I think I need that much) and deal with the new proportions at the time.
Remember when you start that you're putting in 1/3 of the amount of the final mix. That's important if you only need a little. Since I was painting a bunch of figures this is what I did.
Step 1 - Matte Medium
Matte medium is the base for this so I figured I'd start with a fixed amount. The measurements are in drops. I started with 10 drops of matte medium
Step 2 - Flow Improver
This one will be a starter amount and adjust it based on what your color medium is. Inks are the thinnest so they'll need less flow improver. Pigments are the driest so they'll probably need more. So start with less.
Step 3 - Color
Add as much color as you did matte medium. Here's your 1:1 ratio you should be able to keep constant. You'll still tweak but at least you have a baseline. Mix well.
Step 4 - Test
Put a drop of color on a vertical surface and watch how it moves. If it runs, it's too thin. If it runs down into a blob without leaving color behind it's too thin. Remember you want it to move a bit then pool on its own.
By now it should be obvious. Adjust your mix using ONE drop of the appropriate medium and test again. You're in the adjustment stage now so don't overdo it. It's much better to slowly add more than to guess how much you need then find out just how wrong you were.
Continue testing until you get that result shown above.
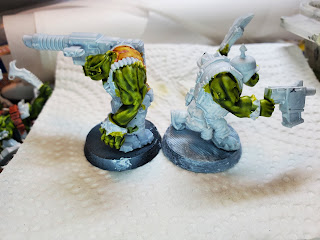
Here's my final result. The yellow on the left figure is real brand name contrast paint. The skin is mine. You can see they're almost identical in terms of how they behave.
Using Contrast Paints
This is something I had to learn as well. These aren't used like regular paints. Trying to do that leads to disappointment and frustration. I know that.
First and foremost - don't use your good brushes for this. You don't need them and you don't want them to take the abuse they're going to get. Mild abuse but still abuse. The biggest potential problem is getting paint into the ferrule since you load the brush when working this way.
Buy yourself a set of decent synthetic round pointed brushes with decent size barrels. You do want to load the brushes but not too much. I'll get to that.
Step 1 - Fill your brush
This may take a few times to get a decent paint load onto your brush. You'll learn the balance but you want enough paint to make sure you can get the recesses filled but still be able to pull off excess with the point. So don't soak the poor things. Just load them well. This is where the potential for paint in the ferrule happens and cheap brushes take that worry away.
Step 2 - Dab it on
You're not actually painting at this point. Starting at a high point on the area do a dab/paint and watch the paint move. Then do the same thing in another similar area. This is where it gets weird as opposed to painting because gravity is involved and there's also wicking from paint already on the figure. Use the tip of the brush to pull off paint that's too thick and press to add more paint.
It's best to try this out on a couple of sample figures to get the hang of it.
Be very careful you don't overload these washes. They may look fine from the top but when you turn them over you find out where all that extra paint when and there's big glops of paint below. Those suckers are tough to remove. Even with good paint remover you'll be picking away at them. So less is more when doing this.
Step 3 - Refine
Don't overwork the paint but go over the areas and remove excess from recesses and paint over areas where it's too light. This is a final step since the paint is still very workable. After you're happy enough with it set it aside
Step 4 - Wait
The combination of mediums makes this a slow drying process. I leave mine overnight between coats. I know there's videos showing how to use contrast paints to finish figures in very short amounts of time but those are using the brand names and I don't know what their composition is. They probably do try quicker. But there's no harm in painting up one color on a couple of dozen figures and letting them sit. Then you do the next one, etc.
Also try to avoid the "I'll paint another color that doesn't butt up against the one I just did" thinking. You're going to smear the first one. No matter how careful you are you're going to end up touching the fresh paint. Accept that these are going to take a while and have other things to work on while they're drying.
Summary
As I stated earlier I wasn't a fan of using The Dip (that includes the Army Painter method) in the past. And I'm not saying I'll use this on a regular basis or as a main method of painting other models or armies. But for these models I find it a very useful way to get the style of painting I prefer with minimum effort.
Here's the end result of my skin experiments. I'm not sure that I need to worry too much about how the undercoat pools since the green is pretty dark and covers it up anyway. I'm still pondering putting a touch of the undercoat on the highlights of these when the time comes. It may or may not be needed and having a hoard army means there's a lot of models.


No comments:
Post a Comment