Wednesday, December 19, 2012

Dreadnought is done!

These things might be futzy to paint but they're also quick.  Relatively speaking, that is.   Then again I'm painting to a tabletop level and I'm trying to impress anyone but me.

It may not come across well in the pictures but the ring on the back of the ship and the "windows" on the particle accelerator on the bridge are painted in a blue-green.  Looking at the pictures it seems to be too close to the blue on the rest of the ship but in person it does stand out.

You can see the turrets in the background.  Once I get this one  varnished I'll take some pictures with the turrets in place and with some of the escort ships.


Tuesday, December 18, 2012

Dreadnought half way done

I decided to move on to one of the larger ships.  Because they look cool.  Turns out they used all that space to put details everywhere.

This ship has 2 different types of turret - regular ordnance and energy weapons.  I decided to magnetize the turrets so I could swap them out.  I also decided to magnetize the bridge section so it would be shorter.  I was careful but not careful enough.  Of course I screwed up the polarity of one of the magnet pairs.  Luckily it was the bridge so I'll epoxy it down when the ship is painted.  Lesson learned because the battleship can run immersed and the bridge section is put into a clear template.


The plan is to put a wash into the circular part on the bridge and paint the ring in the back to represent Element 270.  Which means blue-green.  Otherwise it's going to be lots of the light blue wash in all the nooks and crannies.

Thursday, December 13, 2012

Ships - Fini!

Gee, once I figured it out these painted up rather quick.  The trick seems to be KISS.  Good painting skills are still essential since brush control is important due to the amount of detail that doesn't get painted.  It makes sense, really.

Step 1 - Base coat and metal

I put a white base coat over everything.  Go with thin coats so the detail doesn't get clogged up.  Then I painted everything that would be metal.  And after that I touched up the white to clean up where the paint went awry.


Step 2 - Brown wash

The deck and the metal was given a brown wash.  The deck got touched up a bit where it dried spotty.  The brown wash also took care of lining those areas that needed it.  The last steps were using the brown wash in the details to make them stand out more and touching up the white.  Again.


Step 3 - Blue shadows

I wanted to do a cool blue-toned white.  That's why the first attempts had blue hulls.  I achieved the same type of effect by using a pale blue in the shadows.  And I touched up the white.


Step 4 - Element 270 (Sturginium)

The fluff has the magic rock as a glowing blue-green.  I wasn't going to do OSL on these so I put a dot of the color in the bottom of the smokestacks.

Monday, December 10, 2012

Ships - I didn't get it

Last night I started work on the hulls. My intent was to bring up the white with washes.  Turns out I was incorrect in my technique.

Once again I have discovered that the ways I paint minis are not suitable for these kind of minis.

I'm going to test the idea of how I'm going to get a shadow on these without having a darker base coat.  Since they will be taking another trip into the Simple Green I can test directly on the minis instead of getting to that point and finding it won't work.

I'm not thrilled about redoing these minis a third time but I also knew that I would be using them as a learning experience.  Oh, I've learned all right.

I'm also going to try changing the deck color to something lighter so the metal stands out.  The one I have now looks great but it's too close to the brass and when they're together nothing stands out.  I have a couple of ideas and I'll test them before I start over.  I'm debating between a very, very light tan or plain white - both with the brown washes.   I think I know which one will look better but I have to try them both to be sure.

On a better note I received my rare earth magnets so I can plan on starting the larger ships once I figure out the painting methods.  I'll be using magnets to hold the airships on the flight stands (removable for storage) and for the alternate weapons available to ships.  I'll probably keep the bridge separate as well since they came that way.  It will also make the ships less prone to damage during transport.

Ah well.  Live and learn.  Then blog about what went wrong so other people can use what I've done.

Saturday, December 8, 2012

Ships, Take 2

This time I think I got it.  Fewer colors, more washes.

For the hull I'm going with a blue base coat so I can work it up to white.  This hasn't changed from the original color scheme.


You can see the wash around the parts that are going to be gold, once I get to them.  I wanted these to stand out.  You'll also notice the rivets didn't get the same treatment. See my previous post about getting too caught up in the details.


This is the wooden deck.  I do like the way the space between the boards pops when I added the brown wash.  Two coats of wash because the first one just didn't have enough emphasis.  Not all the ships have a wooden deck but for those that do this will work nicely.

Everything that is still white and some parts that are blue got painted with the metallic base coat last night.  I need to touch up a few places with the original blue and then I'm ready to do finishing work.  Yes, finishing work so soon.  I did say I was overworking these paint jobs the first time around.

Wednesday, December 5, 2012

And into the Simple Green they went

The little ships are much different from painting minis.  There's a lot of great detail on these but it turns out not all of it gets painted.  Weird.

My ships went into the Simple Green bath last night and are now sitting here in spiffy new coats of primer.  I also couldn't glue them onto craft sticks like other mini.  That made it very difficult to get to areas to paint.  They're now on individual bottle caps and I used poster tack to hold them in place.  The resin is very slick and the glue didn't 'take'.  Live and learn.

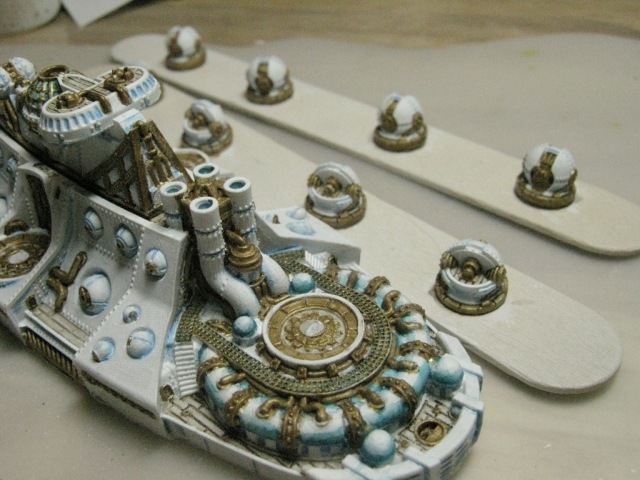
My paint scheme idea was about 75% good.  Problems included, but were not limited to, having too many colors and trying to paint too many things.  I'm going to take silver and grey out of the mix and do the blue-white and gold.  The "power source" is a blue-green per the fluff so that will be in there as well but shouldn't look that bad.  It's not in a lot of places but it is there.

I also painted some of the areas out of order.  That one was my fault entirely.  I know better than that.

The experience I gained will serve me in good stead.  I also looked at some of the larger ships and found out what will work better on the smaller ones.  Some of the detail just isn't there on the larger ones so I don't have to worry about it as much on the small ones.  This pleases me.

Tonight I hope to at least put on the blue base coat again.  That will take 2 coats since I need to put on thin layers.  It would be too easy to clog up the fine detail and I use thin layers anyway.  If I get that done then I'll shade the areas that will get the gold detail.  That will be plenty for one night and will get me started on them again.

I'll try to take pictures of them this time around and post WIP shots as I go.  My guess is that I won't be using the Simple Green again but even if I do it's good to see what happened and why it didn't work.

Monday, December 3, 2012

Painting little ships is .. different

Sorry - no pictures just yet.  I'm not ready to post progress.  I do have a reputation to uphold after all.

I'm still working on the Spartan Games Dystopian Wars Covenant of Antarctica frigates and I'm using them as a test of the color scheme and how to paint the things.  Already I'm finding out what details are important to paint and which ones aren't.  So I've "wasted" a fair amount of time painting bits that I'm now painting over.  Learning experience, right?

That's why I started with the group of frigates.  They're small enough that they'll get lost in the mass of ships and painting a set of them lets me see how it all works.  I'm not exactly happy with them but not unhappy enough to strip and start over.

I think the color scheme is going to work well once I get through the process.  I'm going with blue-white (to match the faction flag) and I'm trying something new to me.  I have a light blue that is both the darkest color for the white and the lightest color for the blue.  I don't think I can get much more coordinated than that.

By the way - silver rivets on white are NOT worth the effort.  I shall not be making that effort/mistake on the rest of them.

Once this army is done I picked up a Russian Coalition one.  If I match their flag I'll be painting red and black.  Two difficult colors I would never use in an army.  Or a navy.  Or an air force.  We all know I'll find a way to work them in at least as accent colors but geez.  Red and black?