Showing posts with label progress. Show all posts

Sunday, May 5, 2019

A Very Productive Weekend

It wasn't as productive as I hoped but I'm very happy with what I got done.

First off - basing sand for miniatures. Long, long ago I bought a pound of something called 'decor sand' at a garden store. It was sand with a mixed grade of granules so there was some really nice variety in there. I used it on my minis to much success. But then I ran out. I couldn't find anything local and made a make-do mix of sand and talus.

When I went back to the Midwest for a friend's wedding a few years ago I went back to the store with the intention of bringing home several pounds of it. Sadly they no longer carried it.

I continued to limp along until I saw one of DM Scotty's videos where he recommends construction sand for that exact thing - far more irregular mix of sand for basing. I was happy!

Construction sand only comes in forty pound tubes. That's a lot of sand. I did get a broken one at a seventy percent discount and it sat in the trunk of my car for months. Mostly because I literally had no way to carry it to the apartment. It was very precariously bagged.

Finally this weekend I used the sifter I printed (I checked the manufacturer's description and found that the largest grit was far larger than I liked for minis and printed a sieve of appropriate size) and separated all the sand. I had to do it over two days because I ran out of storage containers and because it was getting dark on Saturday.


On the left, basing sand. On the right, rocks. Underneath, sixteen inch paving stones to go under the upgraded 3D printers and a broken cut-off wheel from the next listed project.

Yeah. I'm going to have to find a home for a lot of this sand. Because I have way too much of it even with the number of minis I need to paint. I'm still debating about that. There were a surprisingly small amount of rocks in the mix which makes me happy. It still leaves a lot of sand.

Next up was shelf support. The shelves I put in the craft/sewing/office room didn't have enough dividers. I used an extra set to add a level above what the intended size was so I really can't blame them. The top shelves were always intended to hold army transports both empty and full so that was going to need to be fixed.

I bought a four inch diameter pipe from Home Depot and needed to cut it down to the correct size. That pipe sat in the room for months. The shelves sagged more and more. This weekend it was remedied. The pipe was cut (combination of Dremel and hand saw) and the cut edge smoothed and chamfered. With only moderate profanity it was wedged into place and the shelving unit is now complete.

Before:

After:
Scary sag gone. I made sure the size would be enough to span all of the shelves and support them equally. No more worries about the top layer collapsing and the shelves breaking, much less what would happen to what was on them.

Next up was 3D printer related. One of the fans died and the replacement fan I had didn't have the correct connector. Correct fan, not correct connector. The solution is to solder the new fan onto the old cable. It's a known solution and not something that bothers most people. You can buy fans from 3D printer stores with the correct connector in place but I got mine from Amazon. I'd been putting off the project because I just didn't want to do it. That and my soldering skills are somewhat rusty.


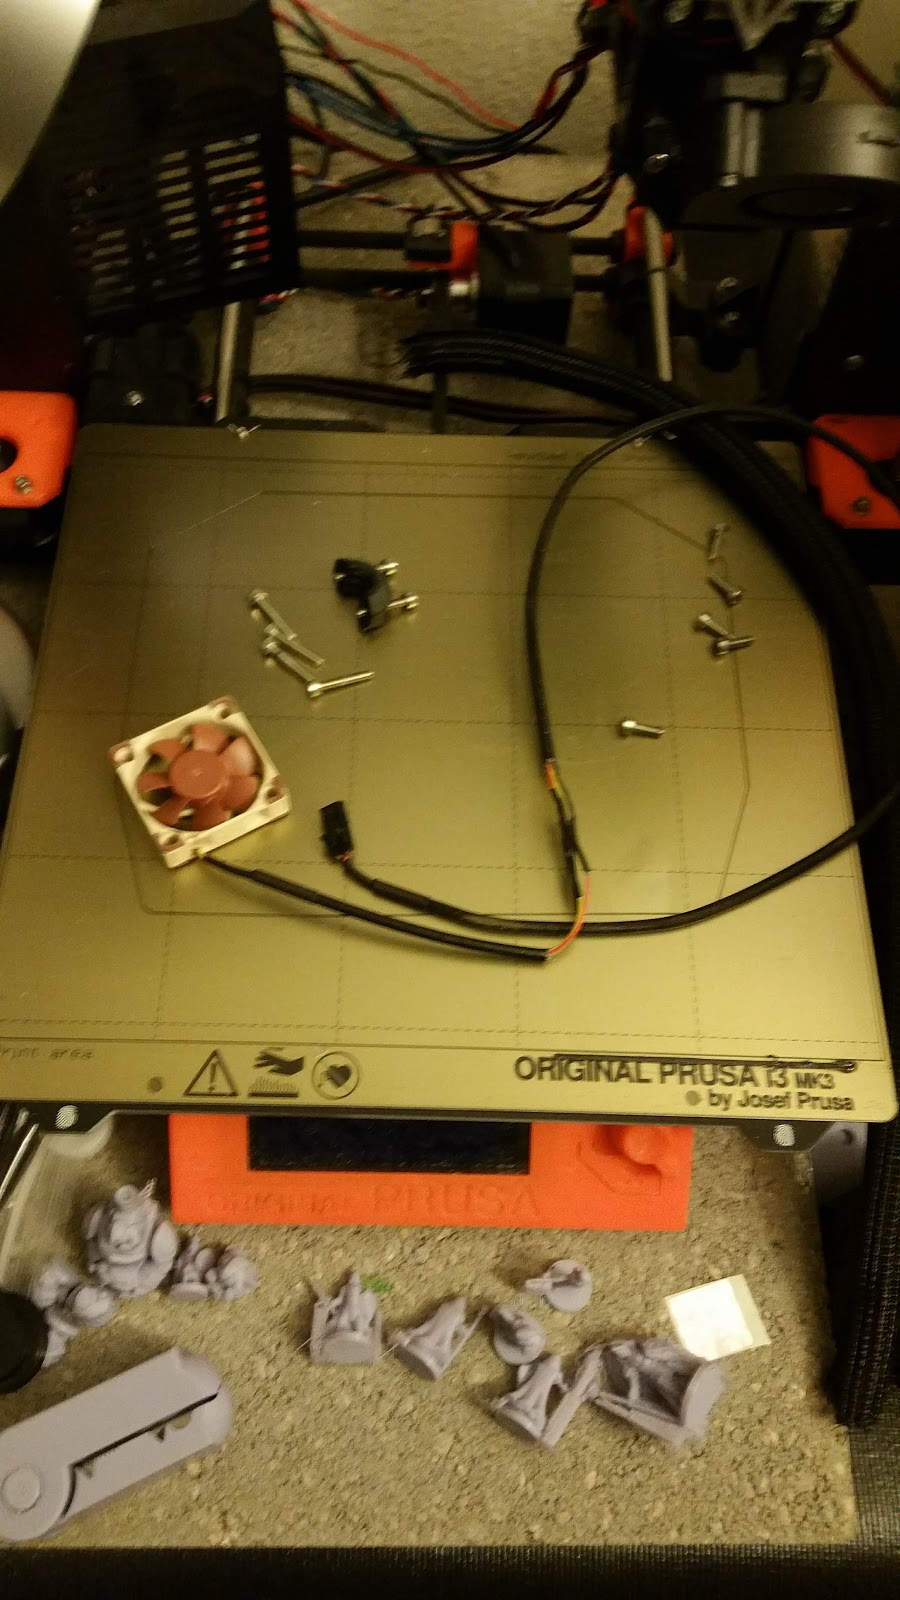
Solder and heat shrink tube later and I have the new fan ready to be put into the printer. This is the one thing I didn't get done that I had planned. I was going to reassemble the printer and yes, I could have done it instead of writing this very long blog post. But I know my state of mind and would rather not have tried to reassemble it tonight. I know my limits. I'll do it this week after work one day.

Those are various and sundry 18mm miniatures I've printed along with a very handy nipper for cutting filament at the right angle to load into the printer. I printed that too - except the razor blade inside. It's also darn good at nipping incautious fingers.

Last but not least was something for me to do while I had all the stuff out to cut the support pipe. A future as of yet not disclosed project needs a rubber squeegee. It needs a small rubber squeegee. Shopping for the correct kind of rubber squeegee (I like the word 'squeegee' it seems) had me asking if I was in the wrong line of work.

Ingenuity to the rescue.

This is 3 squeegees cut down from a dollar store bathroom shower squeegee. They will work exactly the same and cost significantly less. Even better is that I can replace them very quickly.

So that was my productive weekend. I also made a trip to the not-so-local but much friendlier game store to buy the new Chessex dice that were released last week. As I warned them I ended up not buying two of the styles because they weren't attractive enough for me. These dice have swirls of color and it's very subjective. I did get two sets of another style (one to leave as-is for the collection, one to repaint the numbers a more pleasing color) and two sets from the case. One set is trade/sale fodder, the other is a nicer version of one I already have.

It might not sound like much but I did more this weekend than I've done in a very long time. I even spent a little time on the stationary bike in the apartment complex fitness room to try to make my knee feel better after standing at the trunk of my car sifting sand for far too long. It worked, along with the heating pad after.

I'm very proud of what I accomplished and the tasks I finished. I didn't just do things - I finished them. All the sand is sifted and my car trunk has been emptied. The support piece has been properly cut and finished then wedged into the shelves. Actually finishing tasks is something I'm not great at  so doing so many of them in one block of time is something I'm going to put in the win column.

And during all that I had an idea for the blog to make more content that wasn't 3D printer related. I'll have to polish up the idea and see how it flies. Stay tuned. Better yet, follow.

Thursday, February 21, 2019

Kapton Tape Sucks

That was an attention-getting title. I'm not above clickbait.

Kapton tape is really kapton film with adhesive. This stuff is thin. Because it's thin it likes to twist, ball up, not go where you want it, and generally be a pain in any sensitive part of your anatomy you want to name.

I got the wires taped up. Moderate profanity was used. One large problem was that I was doing this without disassembling the extruder. Had I taken it apart it would have been much easier. But I went the lazy way.

I'm not sure that the part is good on one of the printers. It's still doing some temperature fluctuations but that's also happening when there's some really odd airflow patterns from the part fan.

OK. Let me explain that one.

There's two fans on the extruder - the hot end fan and the part fan. They both do what the names say - the cool different parts of the process. The hot end fan isn't nearly as powerful as the part fan and keeps things constant for the heater. The part fan is a tricky beast since it's trying to cool the molten plastic without cooling it too much. There's a shroud that fits the end of the fan and tries its best to direct the air where it should go.

When I had the shelf accident I think that the part fan on one printer took enough of a hit that the bearings went wonky. It certainly rattles when it's running. 


The extruder fan is on the left. There's a hole in the extruder body to let the air in.

The part fan is on the right. The R3 upgrade put it at that angle. There's discussion whether the angle of the fan causes extra stress on the fan bearings or not.

The wires that I taped are those red ones. The tape is orange. The red wires are the nice, thick heater wires. The thermistor wires (the tiny ones) aren't seen here. But they're blue. And tiny.

I'm not replacing the fan yet for these reasons.
  1. It seems to be working;
  2. There's an upgrade planned in the near-ish future;
  3. Replacing it is a pain in the sensitive part of the anatomy (at the moment at least).
The reason replacing it is a pain is 85% the part itself and 15% me. After I do what I should have done when I last upgraded it then the split will be 95%/5%. Here's the problem. The fan is a generic notebook fan. Which is great, they're easy enough to find. But the wires are far too short for use in the printer. So that's on us.

Some people solder them. This is actually a replacement fan and I went the lazy way (go figure) of unsoldering the wires from the old fan and soldering them directly to the new fan. A little bit of futzy work but it's been fine. Going forward I was thinking I would solder them in the wire run instead.

The second printer is different. The previous owner put a connector on the wires. That way when you replace the fan you put a connector on the new fan and it's easy enough to replace it. Brilliant! I even got those same connectors. That way I would have both in the same configuration.

I didn't put the connector on when the printer was nicely in pieces. I was going to do it but went "Eh" and didn't. Now I'm paying the price for it. If I could replace it that easily I would do so. I have plenty of spares. It's more of a chore to do it now when the wires are bundled up.

Enough technical talk!

I did do some printing but that large print that failed kind of burned me out for a bit. That's another reason the printers are idle. I needed a break. I really enjoy printing but it was wearing on me to have them going all the time. I did do a test print on each one and that's how I know what's going on with the thermistors. But for now I'm letting them be idle.

On a better note I have the temporary camera stands printed and assembled. The next/last step is connecting them to the print servers and setting them up for monitoring and time lapse videos. Of course there's more steps than that but it's the general idea.

There's ALWAYS something to do when you have one of these things. Image it with two...

Tuesday, January 1, 2019

All Right Then

Airbrush

I have the compressor, the moisture trap/pressure regulator, the AIR HOSE, and all the air brushes where I can find them. The compressor et al is also set up where I think it's going to be when I'm using it.

The space for the booth has a piece of foamcore on it as a base for the photo tent/spray booth when it arrives. The turntable for inside the booth is sitting in a box but I can find it easily enough.

I haven't done any airbrushing because:

1 - It's been too freaking cold.
2 - Housework was needed.
3 - 3D printing.

That will change this week since the temperature is going up and the housework is getting done. About the 3D printing...

3D Printing

I was completely sick of printing grey and printing dungeon pieces. Printing grey dungeon pieces was excruciating. Therefore I took the holiday to print some stuff that wasn't grey and wasn't dungeon pieces.

I properly labeled all the test prints (low poly cats) with the brand and color of each one. I have the start of a filament cat army on the windowsill.

I also printed up useful stuff like a grip for painting miniatures, a clipper for filament (it has to be cut at an angle to be loaded), and a new case for the Raspberry Pi media server. I printed in colors! Pretty, pretty colors.

I also put up the last long shelf on the adjustable spacers and filled it with .. filament! That got the worst of it out of double rows under the printers. I also lowered the short shelf one notch so it fits all the types of boxes I have. That helps. A little.

3D Printer Repair

Absolutely nothing was done on this since the board is still in transit. It got to spend new year's eve in Germany but now it's on it's way here. It's still showing tomorrow as the delivery date but we'll see if that happens.

Since the order is a decent amount I need to sign for it. I certainly hope it shows up early because I was kind of planning on going to the post office and to the craft store after work. But if I'm waiting on the delivery that gets postponed.

Once the board is here I can restart the upgrade process and hopefully have it running by the weekend. That will be more grey dungeon pieces being printed but for a shorter period of time. Win some, lose some.

Convention

I'm still on the fence here. A big incentive for me is gone since there won't be a Chessex dice booth there. High cost and low profit were the owner's reasons for not showing up and those are perfectly valid. But I have a long shopping list and now I need to think about why I would go besides running my games.

BTW - the vendor list is currently almost empty. As in most of the spaces are showing as Available. If they haven't updated the website that's not a good sign. If that's true it's not a good sign.

My events are still showing as free even though it was supposed to be fixed a month ago. Their dashboard shows them at the correct price, the event ticket buying site shows them as free. I'm letting them work it out. Their systems are not my concern.

I'm giving it a few weeks to see how sales go. If it gets within a couple of weeks of the convention and there's very low or no ticket sales then I'm going to cancel. I know, I know. I committed to running the games. But if there's no one choosing to sign up then I won't be running games. I'll be sitting next to a table being bored. And having to pay for the privilege since I don't know if they reimburse for events that had no players. Actually I don't know their full badge reimbursement policy - commit to run the games or actually have enough players?

Housework

We're not going there.

Saturday, December 29, 2018

Churn Baby Churn

This poor printer is just running through kilometers of filament churning out dungeon pieces. I am personally very tired of grey filament. Very, very tired.

There should be two printers doing this, halving the time, but my other one is still down waiting for the replacement board I ordered this week. They haven't even shipped it. Sure, they're blaming the holidays but I need the stupid board. The printer is a doorstop without it.

And then I had a clog that was resistant to the normal methods of removal. It was kind of cool to see the filament extruding in two streams instead of one but that's not really the point. For the first time I used the acupuncture needle they include with the kit to try to move whatever little piece of gunk that was in the way to a place I could remove it.

Then it was a few rounds of cleaning out the nozzle (look up 'atomic pull' for the details) and then it looked like it was good. Although I didn't see the piece of whatever in the cleaning filament.

I 'lost' about twelve hours of printing because of this. I could have tried to clear it last night after the print finished but I was too darn tired to trust myself with printer maintenance. I know better. I'll give up the time to make sure I do it right. This morning I was there, swearing at the printer, doing maintenance.

I should do some calibration again and I think I'll do that when the other printer is ready to go. I will calibrate them both at the same time and then it's off to the races. At least off to 'printing the rest of the dungeon pieces'.

I have the lights for an LED torch wall section but I'm iffy on doing it now. At least I'm iffy on doing it for the convention dungeon. I have a legitimate reason. Hear me out.

The piece is rather clever. The part where the torches are is a separate piece you print in transparent orange (or yellow or whatever) and then there's holes in the back where you shove the mini LEDs. Overall it's a very efficient design using an off-the-shelf light string and battery holder. But here's the catch. That entire panel of torches is out of the transparent filament. So there's this line of orange in the middle of the stone.

This isn't a problem with the addition of that thing called 'paint'. But as of now I don't think I'll have time to paint it before the convention and I don't want to bring it primed because then there's fingerprints on the primer and I don't know how the rest of the paint will adhere. Right now it's all a consistent light grey. To use the LED torch walls I would have to paint the orange sections at least and then they'd stand out just as much as if they were still orange.

It's something I'm pondering. Once I find my airhose for the compressor (dammit I hate losing things) then I can figure out how long it would take to paint this. I can practice on scatter. I plan on using the primer as the main color and then just accenting it with some random bricks and overall drybrushing. And then there's varnishing. So it takes time. Time I could be spending painting the darn minis.

I might have to give up on the airbrush for priming and either use the rattle can or paint it on. I want to use the airbrush but I don't want to waste too much time looking for the missing hose. And before anyone suggests it I want this hose for a reason. It's brand specific so it's threaded properly, it's a braided hose so it's more flexible, and it has the quick disconnect adapter attached to match the quick disconnect adapter on all my airbrushes. It's not cost effective or useful at all to buy another hose and adapter. I'll look more tonight and if not tomorrow I bring out the rattle can and be annoyed.

Friday, December 21, 2018

The Doorstop and The Dungeon

My original 3D printer is still a doorstop. The controller board is bad. I'm in communication with the manufacturer since the printer itself is out of warranty but the board failed during the upgrade. I'd like them to cover at least some of the cost of replacement if they won't cover the whole cost. We'll see  how it plays out.

The other printer has been chugging along just fine. I had planned on twice the output because I'd have twice the number of printers but that's life. I'm running it almost 24/7 and it hasn't complained.

Slowly but surely I'm getting the pieces I need for my new modular dungeon. They're all printed in grey so even if I can't paint them in time they won't look that bad on the table. I'd like to paint them if possible. I even ordered a big bottle of the primer I want to use with the airbrush when I ordered some other things during their pre-holiday sale. That bottle should easily cover the entire dungeon and then some.

I also set up the new print server for the new printer. I finally printed a case for it that attaches to the frame. My previous one was just kind of sitting on the table and I think I broke the power connection because it wasn't secure. I have to exchange the memory card and I think I'll give this a try as-is because the new case is really steady on the frame so the power cable won't move around much.

I haven't set up the cameras yet because I'm waiting for both printers to be in place so I can get it all in order. I have the lamps I wanted so there could be enough light for good time lapse videos and I think I know what camera stands I'll be printing. I may print out a sample of that to see if it needs adjusting or if it will work as designed. I also have to make sure that I have the proper length cables for them. So much to set up but then it's done.

I ordered spare parts for the printers and will be ordering more from the manufacturer when I get my board. I have to pay for the overseas postage anyway (unless they cover it for me, which would be acceptable) and the things I added didn't increase the cost. They're parts I may never need but if I do I can be up and running again soon. The ones from Amazon will be here in a few days. All this means is that I need a box I can put on the shelf under the printer.

The dungeon itself is looking quite good. At least the pieces are. I haven't tried to assemble any of it yet. Honestly I've been working on getting enough of them printed. 3D printing takes time. Just to print nine of the corner pieces takes 37 1/2 hours. Nine of the single walls take around 25 hours. Note that these are attached to floor tiles so that adds time. Printing nine floor tiles takes 12 hours. It all adds up.

Mind you I'm doing different levels of the pieces at different layer heights. The stuff that doesn't matter as much - the things that don't have a top surface - I'm printing at the thickest layers the printer nozzle will handle. But doing that on the flat, textured layers means they look terrible. So I change those to be very thin layers. Thinner layers means longer prints. I weighed it out and I'd rather spend the time up front and have pieces I like rather than go faster and be unhappy with how they look.

I'll do a post just on the dungeon setup itself when there's more to talk about. Right now it's all about printing the pieces that go into it. I may do the math at the end for how much time and how much filament went into making the pieces since that's kind of interesting.

There's been some discussion on how 3D printed dungeons compare to Hirst Arts dungeons in terms of time and money. It's an interesting discussion. 3D printing is 'set and forget' while Hirst is a lot of steps. Having done both I think I might try to compare them and see what differences there are for those considering which way to go. I don't know if there will be a clear winner or not. I would surprised if there was. The Hirst vs Dwarven Forge ended up with "both have advantages and disadvantages" after it was all said and done.

Saturday, December 15, 2018

3D Printer Woes

I'll do my best not to get into the technical weeds here.

I was upgrading my first printer to the 2.5 version. It's not a difficult upgrade (as far as upgrades go) and the Prusa site is really good with instructions. Except for one thing they made a video for some reason but I digress.

I had put it off for a while because I didn't have the table clear for the upgrade and the printer was working. But then the plastic cover on the print bed started getting damaged and I had this other, working, upgraded printer so my excuses ran thin.

Especially thin because I had cleared enough space to fix the second printer when I bought it and even did a minor R2 to R3 upgrade at the same time.

I went through the instructions and only have one thing where I screwed it up. It doesn't matter that one of the motors is rotated by 90 degrees. There's replacement motors that have to be rotated so the writing is sideways and the wiring isn't stretched. I won't even see it much.

When I had it back together I started to test and calibrate it. It didn't pass the second test. One of the fans wasn't working. It worked before the upgrade! And now it didn't work!

Thanks to help from some really smart people online I checked everything and it turns out there's no power going to the pins that connect the fan. This is bad. This is expensive. This means that the controller board had something go wrong. Since the box that houses it got replaced I did have to move the board around but I was darn careful.

After confirming that everything worked except the fan (that I can tell) I contacted support. My printer is out of warranty so the person on chat couldn't just send me a replacement board, even though it went bad during the upgrade I did buy and should be in warranty. However he said to send an email and they would see what they could do.

The really smart people are now suggesting that I see if there's a solder break between the connectors and the rest of the board. So that's what I'm going to do when I'm less clumsy than I'm feeling today. That means unplugging the nest of cables and taking the board out. The cables are more of an annoyance than the 4 screws holding the board. But there's a good chance I can simply touch the soldering iron to one of the pins and let the heat do the work to resolder the join.

Luckily I know how to solder. And also luckily I've got really smart people who are willing to talk me through things like how to use the multi meter to check if there's power going to the connection. This was my first time working inside a live system and didn't want to do anything bad since it's connected to power. That's one fear down. Or at least minimized now.

I'm also taking this time to reprint some of the parts because I printed the first set on the not-upgraded printer and I'm not happy with how some of the nuts and bolts fit into it. I did a test and think that the upgraded printer gives a better result. Those are printing now.

Yes. You print parts to use on the printer. Even the upgrade comes with one printed part (high temp plastic that most people don't print at home due to it being fussy and having fume issues) and a spool of the kind of plastic the rest of the parts need. The instructions have the link to the parts files. Which means you need a working printer (or a friend with one) to upgrade your printer. It's a little wacky.

The upshot of this is that the second printer I bought is still doing all the work and the first printer decided to hiccup while I was upgrading it. Since the board isn't working anyway I can't hurt much by trying to reconnect the fan pins with a soldering iron. And it makes me want to learn more so I can help other people fix their printers too.

Friday, May 25, 2018

I'm Back!

Well. Let's see how long it lasts but for now I'm back. I took a hiatus while dealing with life issues. I still have life issues (and I'm not naming names but you should know who you are) but I'm also getting some stuff done so I might as well blog about it.

You won't hear about the life issues unless they DIRECTLY relate to my hobby stuff. And by 'directly' I mean intertwined or in some way integral to the post in question. I purged my blog of the personal posts when I moved it from my own site and I'm not interested in putting my private life on display. 'Nuff said about that.

I've moved into 3D printing a lot of stuff so be prepared to see that more than hand crafted things. Personally I think the market is glutted with the big name crafters so I'm not too worried I'm going to prevent people from learning anything new. If I do have tutorials they'll be hosted elsewhere and I'll link to them.

I do plan on going back and fixing all the broken picture links. They will either be the original pictures (when possible) or new ones as needed. Blogs about mini painting aren't very good without pictures. That's high on the priority list even if it is seriously tedious.

Unless there's interest I'm not going to go into the process of 3D printing. Maybe I'll make some kind of sticky post if this allows for it so the basics can be there for anyone to read. This isn't a blog about 3D printing. It's about miniatures, terrain, and gaming. 3D printing is a tool.

After I get pictures back in place I want to get current with what I'm doing. I have a lot of things backed up and haven't been doing much hobby work for far too long. That happened because reasons. I still have reasons not to do it. I have reasons to do it. But I'm doing enough that it currently makes sense to start blogging again.

Now about that 3D printing thing. I will be showing non-gaming things that I print if I find there's a reason for doing so. I will mark the posts as such for those who want to skip them.

But hey. I'm back!

Saturday, January 19, 2008

Slowly but surely

Slowly I turned, step by step, inch by inch....
That's how this arena project is feeling.  But it is getting done.  Over the last two days I got the veins on the marble (with a little assistance from a tasty adult beverage) and the copper painted on.  All that is left is the verdigris, the flames and the touchups.
Then I set them aside until the dogs aren't freezing to the lampposts and work on my fountain.  (I'm waiting until it gets warmer and I can varnish them, if that wasn't clear from what I just said.)
I stopped by the hobby store and picked up a couple more bottles of craft paint.  I got a rust-brown for the granite I'm going to paint and the color I plan on using on the second arena set.
I know I said I was going to use burgundy but I picked up a red metallic instead.  I think that will stand out more against the black, which was becoming a concern of mine.  And it's .. shiny!