Showing posts with label Minis. Show all posts

Thursday, July 30, 2020

3D Printing - Resin Prints!

I think I've made almost every user mistake that I could with this resin printer. The printer itself is a champ. I'm a chump.

The good thing that's come out of making all those mistakes is that now I know how to fix them and also how to prevent most of them. There's always something that can happen but I can minimize the chances.

So you want to know what the mistakes were? Of course you do.

The first one was not knowing how to get the best settings. There's all kinds of preferred ways. As it turned out the default settings that came with the printer were almost exactly what I needed to use. More on that in a bit.

Once I knew the settings then I had to figure out how best to support the prints. Ya see, these prints need a hella lot of supports. They print upside down so anything that sticks out needs some kind of attachment point. They also work best when parts are vertical rather than horizontal. Here's a visual. Notice the wacky angles of these things. It's a trial and error process really.


See the lattice? That's support material. It narrows to a very fine point where it attaches to the print but it has to adhere to the base. See, there's a battle going on between the resin that's cured on the film at the bottom of the vat and the resin that's cured on the print. The film is supposed to release so that the print builds. Notice those words - "supposed to".

Those supports are nice but they're not enough. The print lost the battle when it came to being pulled up off the film. I did two things to fix that. I added a pad below so that there was a LOT more adhesion to the bed and I slowed down how fast the bed moved up. That way it had time to release the suction. Here's what a print looks like with the pad below the supports.


Yes. Different models. And look at those supports! But that problem resolved itself nicely. From the first picture I put the middle model directly onto the print bed without those supports since she didn't need extras. And I had quite the time prying her off. When they adhere they can really adhere.

What happens when a print fails? The resin builds up on the film below. This is bad since the print bed is going to push down on it for every layer it tries to print. That's why my first film got punctured. And it's why they ship the printer with another film. I've since ordered more, just because I know I'll need them and I won't want to wait or hope they're in stock. 

Cleaning cured resin off the printer itself isn't bad. The glass screen is tempered and sealed so resin won't leak into the workings. Soften it with isopropy alcohol on a paper towel and gently scrape it off with a razor blade. Wipe it clean with the alcohol and it's done.

I've had to clean out the vat and remove the failed print a few times now. It's not any big deal once you've done it. Pour out and strain the resin. Pour some isopropyl alcohol into the vat to soften the print (and to check for leaks). Wait. Gently, oh so gently, pry up the cured resin. Check for leaks. Clean thoroughly with isopropyl alcohol. Wipe dry. Replace and refill with resin.

It's pretty much the same process as for when you change resin, except for that part about prying off cured resin.

I've also learned to check how much resin is in the vat before starting a print. While they typically don't take all that much they do need some. I had a print fail because the resin ran out and even though I thought I added more in time I did not.

The only other thing I've done wrong (that I remember) is the orientation of a print when supporting it. This is a big deal. You want the best combination of angle for printing so the details don't get support nubs but the print is going to be firmly attached. The one I messed up had a weak spot where the model itself broke off when the print lifted. Live and learn.

I also learned to check the print about thirty minutes in. Pause it, let it lift to the top, check the print on the bed to make sure that it's adhered and printing properly. Better to catch errors early than to have a big buildup of cured resin that will poke holes in the vat film. All my prints seem to include complimentary cat hair. I guess that's my hallmark now?


Here's a big batch of successful prints. Some of them are for other people and they asked that the miniatures not be attached to bases because they prefer to do that themselves. Fine. That's no problem for me because I need to use a CAD program (Meshmixer) to combine a base with a mini for printing anyway. Most of the ones in the picture were done that way. A few had their bases already in place. Let's just say I've gotten reasonably good at placing mini files on base files and combining them into a single printable file. I'm kind of proud of that.


To be honest this probably one of my least favorite prints. It's from DesktopHero3D which is a site where you can make your own minis. It's a fun site but the problem I've found is that the resulting files are too detailed. It turns out you need to exaggerate the textures and details for them to print well. On the screen that chainmail shirt has wonderful texture. Here? Not so much. But it works and I'll continue to make minis there because it's fun. I added her to a base because DesktopHero3D only has round bases and square ones work better in my games right now.


This guy is the Vampire Lord from Vae Victus (a Patreon) and I really like that swirly cloak. I'm a sucker for fabric. I think he'll be fun to paint.

Notice the difference in details between that one and the one before it. That's the difference between a file designed with detailed options and one that's designed as a unit specifically for printing. Both are good. The Vampire Lord has some thickness to that cloak that's way out of scale. But it also helps keep the mini solid. You can't see it in this picture but he's on a base that was already included with the file.


The picture is a little blurry but this is the chibi version of a couple of 1920s figures from the Gangster Bang Kickstarter. There's full size minis in there as well to match the chibis but I've been wanting to try painting them for a while and now I can print them. These came on their bases so no problems there. Well. Problem. The sculptor didn't do the chibi eye that's most commonly used here. He used a Japanese style that is meant for decals. We had to ask him to make real eyes since he just had an empty space meant for those decals. It was kind of creepy. But he found out more people wanted to paint them than use the stickers so we could choose which option we got.

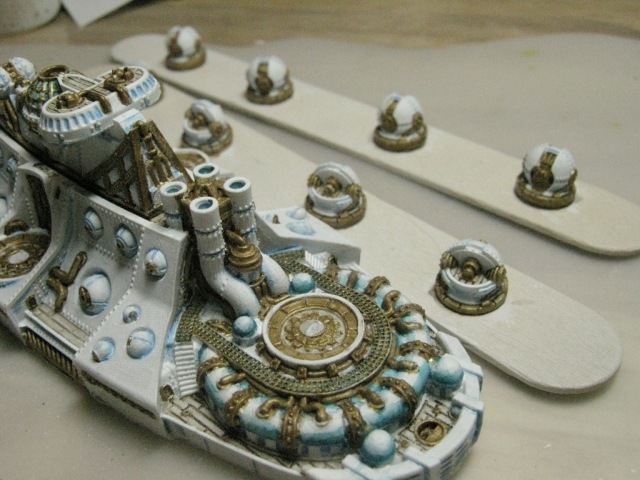
In that pile above are a bunch of minis from Artisan Guild. They're a very popular company. If you look closely you'll find several of the same orc pinup girl. There's also some laying down that are theirs. The person who wanted those didn't want the bases. The one who bought the orc pinup girl did want her on the base and the way she's designed she's better on it so that her weapon is accurately placed. The ogre is also theirs. You can see him in the properly supported picture along with the other one lying down.

Now that I've got the printer working I've had to learn how to post process these things. It's not like the other printers where it's ready to go once you pull it off the print bed. Sure there's supports to remove but it's not nearly the same.

The resin is caustic so nitrile gloves are a must. I cheat and reuse them a few times but this stuff will eventually degrade the nitrile. Latex is not to be considered except as a very last resort and even then only for short periods of time. Sweaty glove hands are part of the process.

The first step is nipping off all those supports. The outer layer of the mini has a coating of excess resin so it's soft. Removing the supports at this point is best since they're most easily removed.

Then it's time to take a craft knife to shave off support nubs. That means running your fingers over all the parts where they attached to feel if they were left behind. The soft resin means it's really easy to get rid of them. Care must be taken in both steps not to cut off parts of the mini. At this point you've got a smooth mini ready for the next step.

The excess resin on the surface has to be removed. I'm using Simple Green in a 1:1 mix. There's other cleaners out there (Mean Green, etc.) that work just as well if not better. The sites all say to use isopropyl alcohol but tests have shown that's actually the worst performer and if you get it wet before the alcohol evaporates it leaves a white reside. I drop the parts into a container of Simple Green when I scrape them off the bed and put them back as I work through the set.

I was using a toothbrush to clean off the resin. It can work but honestly it's a lot of work and mess for not exactly great results. The sites all talk about ultrasonic cleaners so I finally broke down and got one. Oh. My. Goodness. The difference is incredible. I put the prints into a small ziplock bag with Simple Green, seal it, put it in the cleaner, add water to fill the container, then run it for 280 seconds.

The resulting Simple Green is a sickly opaque yellow green when it's done. And yes, I pour it back into the container. Once it gets too nasty I'll put it in the sun to cure out the resin, strain it, and add fresh cleaner to keep going. I dump the cleaner, rinse the minis, and put them in a small Tupperware for curing. I cure under water for reasons that are scientific and boring.

Fun note. If the figure is multi part you assemble it now. Then when it cures it's one solid piece. It also reduces the potential shrinkage issues that come with resin printing.


The resin cures under UV light - sunlight. So I have a curing station (that's the CAD design I did up there using Tinkercad) that I've lined with tinfoil, is on a tinfoil base, and has a solar powered turntable where the turntable platform is also covered in tinfoil. The intent is to get as much light from as many directions as possible. The lamp itself sits on top in the brackets meant for it. It doesn't fit complete tight so there's space for heat to vent.

Yes. I printed my curing station on one of my other printers. I'll be posting it up for other people to download at some point. The light and turntable were a package deal on Amazon

I put the Tupperware on the turntable, the lamp on the curing station, then let it bake for about sixteen minutes. After that I can handle the prints with bare hands since they're done. Done!

As you can tell resin printing is a lot more involved than the other kind. But you get incredible detail (I'm at the coarse level of 0.05mm per layer. I'd like to get it to 0.03mm. That's as thin or thinner than a human hair.) and honestly it doesn't take as long as you might think since the entire layer is cured at the same time.

I've got a number of print beds sliced and ready to go. Once I clear the prints off the bed I clean it, replace it, check the resin level (important!), and start the next print. After that I can work on processing the previous prints or let them sit in the Simple Green for a while. It's not going to hurt them. Or I can leave the prints on the bed for a day or three until I'm ready to work on them, as long as they're not in sunlight.

Uncured resin is caustic. That means all those supports that I remove need to be properly cured before they can be thrown away. I have a large plastic bowl in the sink where I keep the majority of the mess and I've cured the supports a couple of times by putting the bowl outside in the sun. Now I have supports cured to the stupid bowl. The next time I'm at the dollar store I'm getting clear plastic cups so I can transfer the uncured slag to those, cure it, and toss the whole shebang. 

As I said, live and learn. And print!

Tuesday, September 3, 2019

ReaperCon 2019 Review

I already posted a summary update on Twitter but there's only so much you can do with a series of 140 character posts.

These are my own experiences and thoughts about the convention. I've been attending since the artist convention in 2005, missing only 2012 (I needed a break for reasons). So I remember the days when it was at the factory, missed the first move to a hotel, then have been there through the remaining venue changes.

I've also got the comparison between pre-Bones and post-Bones conventions. I'll be making reference to that in my review. There will be more on that following the review.

Day 0 - Wednesday

Travel wasn't so bad. It started out not so great when I got the text that my flight was going to be delayed for an hour, then another text that it wasn't delayed, and then an unannounced gate change. The gate change was a bit of a scare since I'm using the wheelchair service at the airports so they had to push me and another person to the new gate in a hurry. But we made it.

I did have to use two pieces of luggage for the trip down due to bulky/heavy things. I had expected to need the second bag so I had the soft duffel from my GenCon trip ready. The suitcase was three pounds overweight but a quick switch of one item to the other bag fixed that easily. My airline 'gives' you two checked bags without an additional fee, which was part of why I selected that one.

I was the wheels for four other people going to the convention with about an hour's spread between our flights. Eventually we all gathered up and went to the rental car area. I'm a rewards club member and get to skip the rental desk, choosing whatever car I want from the designated aisle. I was a bit concerned about fitting five gamers and our luggage into a sedan but funny enough the only vehicle in the area was a minivan so I got to take it with no upcharge. Fate was smiling on us.

The hotel was the same as last year, if slightly more 'into' the convention now that they had a feel for what we were. Custom room keys (probably paid for by the company), colored lighting, etc. We got our room block goodie bags and dropped our things. Then a quick Walmart run for supplies and we were all set.

The check-in line was long and moved slow, which is about normal. They were having printer problems for tickets, which is about normal. But I got my badge, my class tickets, and a BUNCH of swag bags since two people had me purchase additional ones for them. All that got dumped in the room.

There's a Meet and Greet pizza dinner included in the VIP badge. They didn't get better pizza this year. It's pretty bad pizza. I resort to eating the toppings and leaving the crust behind. It makes for an interesting plate when I'm done and the servers never know whether or not to take it.

After that there's no real scheduled events so everyone breaks off into groups. I hit my room to rest.

Day 1 - Thursday

Hotel stay includes breakfast and this place is nice for having real food on it. I won't repeat this for each day but breakfast consisted of lots of scrambled eggs, a nice amount of bacon, fruit, and milk. Carbs are cheap and easy to get, protein not so much.

I set aside the entire day for shopping. Here's where ReaperCon shines for me. They have an area where all the cast parts are kept before they're packaged. Given the name of the company the area is called The Boneyard. ReaperCon is the only time of the year you can trade in old metal and get new metal ounce-for-ounce. Which means you can get figures for far less, relatively speaking, than buying them retail.

I do a lot of shopping. And I was shopping for three other people so that's even more shopping.

This year I remembered to bring a lot of plastic baggies so I could keep large multipart models together (it's a right pain to sort all that out) as well as keep things organized as I went. It helps with shopping for other people as well.

It's in Texas and there's no air conditioning in that area. It's a concrete floors with shelves six feet high. The minis are kept in those heavy yellow plastic bins so it's a day of standing, bending, stretching, reaching, and generally more exertion than I do at once. This is why I set aside the full day.

Whatever they didn't have on hand they'll cast so once I put my passengers to work on shopping for other people while I finished mine (long list this year) we filled out the casting slips and left. I would have stayed longer but one person had a class that afternoon and I didn't know that when I agreed to be his ride.

I don't like time limits on my shopping.

That night was me being tired so it was a drink at the complementary cocktail hour then a break until cheap appetizers at the attached restaurant. I was also told to try the tomato soup because it came with deep fried cheese fritters. The soup was all right, the seared tuna was overpowered by the relish, the chicken and avocado egg rolls were the best of the bunch. I ate too much.

Day 2 - Friday

I had one class on Friday. I try to take three classes per year, just to keep learning. It gets difficult at times given that I've been taking classes for so long and there's a lot that doesn't interest me. It doesn't help that there are instructors on my 'do not take classes from this person' list either. But I can generally find some classes.

The class I chose wasn't very good for me. The instructor focused on two things that I pretty much already knew how to do and didn't show any different ways for me to try. That and they both depended on dry layers and that doesn't happen quickly in Texas. So instead of nice clean lines we ended up with smeared messes. Which the instructor then tried to give suggestions on how to improve. He stopped looking at mine when I said I could have done it if the paint had time to dry.

I'm not sure if that instructor went on The List or not. I'm leaning towards it.

The rest of the day was me going through the vendors. You get a punch card in your swag bag and if you get it punched by all the vendors you get a free mini. It's a nice way to get you to visit all the booths. I like to shop, chat, and then ask for the card to be punched. I'm in the minority. This was a shopping day anyway, not a buying day.

The selection of vendors is eclectic. One big problem is that the convention is held over a holiday weekend and some of the more desired vendors won't bother. Another big problem is that a huge convention is happening at the same time so if they have to choose one it won't be this one. The last big problem is that the convention isn't that big and it's manufacturer sponsored. Until last year they only had to deal with the last problem. The other two are making themselves known.

After wandering the vendors (missing two because they hadn't arrived yet) I spent time catching up with artists and other people I knew.

I took the factory tour because I like to take the tour. I like to see what's changed, have some pleasant memories of what it used to be like, hear the history, etc. I can't do the upstairs part because of the stairs but I had a bit of shopping to do so I peeled off the tour early and did that. It's allowed. I met up near the end and still got to enjoy the last of the tour itself.

A couple of people I know were arriving this evening so I kept an eye out for them. I had brought stuff for them and I rarely get to watch people open presents. I was able to meet up with one of them, the other hadn't arrived.

Solo cocktail hour but free drinks are free drinks.

I made the mistake of ordering a pizza for dinner. It was a mistake because the tiny fridge in the room would in no way hold pizza leftovers even if I had a way to wrap them up. I really didn't think that one out. So I was back to eating pizza toppings and ignoring the crusts.

Day 3 - Saturday

Two classes today, separated out. I spent my day hanging out, going to a class, hanging out, going to a class, hanging out, etc. It's odd to have that break between classes because I didn't want to start anything with the short time I had. So it was kind of a wandering time.

The first class of the day was great. It was a demo on airbrush usage and I've taken classes from that instructor before. It's been agreed that this one is an inconsistent teacher - on point for some classes, not so much on others. This time there was an assistant of sorts to keep them on track and it helped a lot. I'll bring up my airbrush at the end after the review.

The second class of the day was me giving the instructor another chance. They didn't do well, in my opinion, teaching a class the previous year. But I liked the topic of this one and they had already taught it at GenCon so I hoped it would be better. My hopes were in vain. This one was another wasted class. And this teacher is on the 'do not take their classes' list going forward.

Cocktail hour again. The hotel had some special con-themed drinks so that was fun. I had the Dragon Tears blue thing and it was tasty. Actually I had two of them this time. I only had one the night before.

I socialized a bit and then had dinner at the attached restaurant. I just realized I had a coupon for that place I could have used, maybe, but oh well. Dinner was all right and far more than I'm used to eating.

The painting contest awards are held on Saturday evening and there's nothing of interest for me there. Everyone I know puts entries in the contest so I'm on my own during that time. I hung out in my room and read.

Day 4 - Sunday

I leave early on Sunday now because I have no interest in the auction and that's the big event of the convention after the painting contest. It's kind of bigger because there's free stuff. It's free because you can only bid using convention money you get from participating in convention events. There's nothing I want or need so there's no reason for me to stay.

Once again an unannounced gate change at the airport but that was the only hiccup in my travel. My suitcase was lighter than when I brought it because I left a lot of things there and had all my shopping shipped home. It was worth the cost.

Home

It seems like my cat suffers from separation anxiety. She's been a perfectly trained cat until this weekend when she did unspeakable things to the pet bed and my bathroom floor. According to the person watching her that happened on Saturday some time. So it was after I was gone for a few days and she was left alone more than I would like. They could only visit once per day during the week and I think it was more of a 'food-water-litter box' situation than spending time with the cat.

I think she's better because I spent Sunday and Monday making sure she could find me and get attention any time she wanted. I did have to unpack the suitcase and I've made sure she has no ability to do unspeakable things to it. I hadn't planned on going into the office this week so she'll have me around more than just that time. That plan was made to give my knees some time to recover.

Summary

I didn't do any of the fun painting stuff I had planned and I'm not exactly sure why I didn't. I walked by the area any number of times. There were open spaces. But for whatever reason I didn't sit down to paint the free minis. I'm going to have to think about that one.

I'm never quite sure why I keep going to this convention. I don't socialize much and every year there's fewer and fewer people I know. I take a few classes. I don't enter the painting competition. I think it's the shopping that keeps me going and habit. If I didn't go to this one I wouldn't go to anything. It's a sobering thought.

Bones

What the heck are Bones you may be asking? Until several years ago everything Reaper put out was in metal. Then they used Kickstarter to start their plastic injection molded line. They call those Bones. That was a turning point for the company and their customer base.

The Kickstarter got a lot of attention and a lot of people who had never been a part of the hobby dove in. The site forum exploded with new people and everything was Bones, Bones, Bones. Then there was the second Kickstarter. And the third, And the fourth. The fifth is starting in a month. Plastic is the thing for the bulk of the attendees. I'm a metal snob so I don't bother with the plastic stuff at all.

The vast majority of the convention attendees have never painted metal minis. They're all about the plastics. I don't really blame them. The cost difference is significant and most of the new stuff is in plastic. It's the old timers who have more affection for metal. And the competition painters but resin is good enough for that as well. Metal is becoming sidelined.

Airbrush

I almost forgot I was going to put in something about my airbrush.

I have four Badger airbrushes. I really only need one but anyone who knows me knows I go big when I go into something. One thing I did during a sale was buy replacement triggers for them that are taller so there's less hand strain when using the airbrushes. That means taking them apart and replacing triggers.

It wasn't bad to do that. It's always good to know how to disassemble and reassemble your tools.

Except for one of them. That one didn't slide like it should, didn't move like it should, and there were air bubbles around the cap. Fine. I set it aside and didn't think much about it. Then the convention started getting closer and I had two chances at having professionals look at the thing to find out what I did wrong and learn how not to do that again.

The owner of the company was there. He looked at it briefly and told me to send it to the factor for service.

The instructor for the class looked at it and said "Sure. I can take care of that." and started it soaking in a cup of isopropyl alcohol. He also showed me why part of it was sticking ("Just ram it back and forth a few times until it moves smoothly. It gets junked up with whatever they put on it at the factory."). Once he cleaned it out it was working perfectly. Turns out I did reassemble it correctly or when they were mucking around with it the piece went back into place.

The final thing was the kicker. The bubbles that were coming out around the cap? "Those just happen. Ignore them."

So the only thing truly 'wrong' with it was needing to have the factory lube worked off the needle due to the very tight tolerances of that model. Which means nothing was wrong with it.

Sunday, March 24, 2019

A Quick Update

Things have been happening but I've been short on time to take pictures. Since I was waiting on pictures to do a full blog entry you get a quick update with teasers for what's in store.

I have a pretty good way to print miniatures on my 3D printers so I've got a variety of those to show off.

I've been working on modifying the base for a 3D printed dragon to hold a set of dice, making it a dice dragon. That's CAD work and I'm not great at it but I'm getting better.

I've been finishing more Printable Scenery buildings for my friend so pictures of those will be forthcoming as well.

My printers will be undergoing a significant upgrade and I hope to take pictures of the process. At least I'll have a before and after set. It should be a sweet set of upgrades.

I have some tutorials for Octoprint, which is the software that's on my print servers. They're detailed and I have some preliminary ones I want to get done before the meaty ones.

I've been working very long days which makes me too worn out to do a lot of things in the evenings. That's not an excuse. It's telling you why the blog has been neglected recently. My housework has been just as neglected. I'm fixing some of that tonight since my kitchen had been overrun and I couldn't stand it any more. That and I wanted clean dishes.

So that's what's in store for the near future. Leave me a comment if there's something you want me to write about since you're the ones reading this.

Sunday, July 27, 2014

Latest DungeonBash/Dungeon Crawl

I've taken to using the words 'Dungeon Crawl' when listing my game in convention schedules to make it very clear that it's a dungeon crawl.  The name DungeonBash is great but it doesn't say much about what the game is.  I'm trying all kinds of things to get people interested in playing the game.

I ran the game yesterday at Conclave of Gamers.  This is a new con that expanded from a board game focus into more types of games.  I thought I would pull a double here - help the con by having another game and see what the response was with a different crowd.

I ran it twice and neither time had what I would call a full table.  The first game had 3 out of 4 players (someone played 2 of the characters) and the other game was full during registration but only 1 (maybe 2) of them showed up.  The last seat was filled by someone who seemed to be guilted into playing and I'm not sure how much he enjoyed it.

This is the exact reason why I was testing the waters again.  I have yet to run the game at a convention and fill the table with enthusiastic players.  Even the last game at GengisCon had 3 players and 1 who seemed more interested in me than the game.  The 3 players were a family so 2 were kids.  Not what I wanted but I ran the game for them.

I've come to the decision that not enough people want to play.  The game is optimized for 4 people so not getting that many puts a burden on the other players.  Getting less than 3 is no fun at all.  I haven't canceled those games since 2 people showed up to play but its been tempting.

I changed up the rules for this convention and I'm considering more changes for the future.  Not that I have any plans at all to run it but it's nice to take the experience and use it to improve the game.

  • Pre-built dungeon - I did this already.  Building the dungeon on the fly takes too long during a convention.  If I'm ever asked to run it for a group and we have time I can go the 'build as we go' route.

  • Fewer rooms - When they're searching for 3 items having 9 or 10 rooms is too many.  Combat is random and takes too long for them to get into all the rooms.  Next time there will be 6, at most 7, rooms.  Items x 2.

  • Different monster charts - I didn't like how the current monsters fit into the new format.  I'll change up the encounters to be more suited to the play style.  That means not using some of the minis and duplicate encounters on the chart.  I'm good with that.  I think I can mix it up enough to make it work.

  • Faster multiple encounter progression - The progression feels slow and doesn't add to the tension of the game.  This is an easy one since I can pick from the existing cards to do the progression.  I already did some of that in the last game.


In a way it means making the game smaller.  Having a big dungeon layout is great and attracts attention.  It doesn't attract players.  So a big part of the modular dungeon pieces I made won't get used.  Sad but more effective.

I didn't sign up to run the game at the next upcoming convention.  I knew I could get in if I had success at this one.  I didn't have success.  I won't be signing up for the next convention.

It's a waste to pack it up (after fixing bits that need fixing) after all the work that went into it.  I'm very sad that the minis painted by my friends will get packed up with the game.  At this point I don't see a way to not pack it up.  It won't go out of style so putting it away for a couple of years isn't going to move it off the charts.

What's most disappointing to me is that I get a lot of "That's so cool!  I want to play!" and then when they get the chance they don't.  Or people sign up and don't show up.  I like running the game and I'm proud of what I built and that my friends helped out making it awesome.  Then I sit at a table with empty chairs all around and it's hard not to take it personally after a few conventions.

Anyway.  Here's a picture of the layout I built on the fly at the last convention.  I decided to use the space available to me to make a nice big dungeon.

Conclave 2014 - Big Layout

Sunday, April 20, 2014

Dungeon Crawl

I've been lax about posting pictures from the dungeon crawl in action.  Back in February.  But hey!  Here they are now.

I asked players to take pictures during the game since I've found that I tend to be too busy to take enough pictures.  They did so I have pictures!  Here's some of the better ones.Small battle

Small battle, different angle

More of the dungeon and more monsters

Larger battle and dungeon

And so it begins

Sunday, November 3, 2013

Insult to Injury

I'm not going to name the company here.  It wouldn't do any good.  But here's my tale.

I was accumulating a 15mm army as a gift.  A large army.  As such it's generally not something you can do at one time.

By the time it was about 2/3 complete there was no longer a reason to have it, since I wasn't going to be giving it as a gift.  I won't get into that either.

The company says I need receipts to return them.  Um, who keeps receipts for extended purchases?  A pack here and a pack there add up over time but I can't see who would keep all the receipts.

I was willing to pay the 20% restocking fee even though I tend to disagree with restocking fees when I know they just put them back in the bins.  It was worth it to me to get back the 80% of the cost I would recover.

I received an insulting reply insinuating that I may not be the rightful owner of the minis, that without receipts they can't prove that I deserve a refund, and that I should try eBay.

I did reply with affront but I think I'll be out the shipping cost and end up with a box full of minis I never wanted to see again much less go through all the headache of trying to sell online.  I'll be lucky if they don't try to charge me return shipping.

I won't be buying from them again.  Ever.  Their customer service has shown me that they don't really care about the customers that aren't known, repeat customers.  This is appalling.

If I were vindictive I would make this far more public and be a lot harsher.  Since I don't plan on patronizing them again I would be burning a bridge I never planned to cross again.  But I know it's useless since their loyal customers won't change and there's no benefit in making a public fuss.  Well, any more of a public fuss than this.

Sunday, July 28, 2013

DungeonBash is active again

Well, it will be soon.  I'm working on it!

Unfinished Minis

These are most of the unfinished minis.  OK.  Some of them.  I've got friends helping paint the monster and they have or are painting about 3/4 of them.  Props to Michelle B and Lyn S to doing this.

Painted Minis 01

Michelle painted most of these.  I did paint the player characters!

I've got a few 1 inch dungeon sections left to finish painting and one piece to repair from the last time I ran the game.  Nothing some epoxy won't fix.

The most difficult part for me is getting all the new lists together.  There's very few spells that are appropriate for a non role playing game.  Everything has to deal with combat.  I'm scouring the books looking for those spells.

I've got a nice deadline for play testing now.  One of the gamers here has been after me to run this for his group and we've settled on next Sunday.  I won't have the final versions of anything since this is playtesting and we'll be using empty bases for some of the monsters but that's all part of the process.

I'll try to get some pictures of the new game in progress.  Depending on how much time we have I hope to run a full game (2 hours) and then spend some time running encounters to see how they balance.

Yes!  Once I get it all worked out and after I've run it at the convention I'll post all the rules.  I'll even post the list of miniatures I used for the monsters for those who don't want to hunt for them.  This is a fan derived work for DungeonBash (a copyrighted game) but I have permission to post it as such.  I've mangled the original game enough that I don't think I have any problem meeting the guideline for a derivative work.

Friday, May 17, 2013

Teaser - Mini Conversion Soon

I'm starting in a Deadlands game and of course need a mini.  I've decided that going forward, when game appropriate, I will make both a standing and riding version of my mini.  It's just cooler.  I know Litko makes horse stand bases and they're very nice but they're just not as cool as the mini on a horse.

I plan on doing a WIP on how I do this since it will be an interesting process.  I know it already.  The minis have been ordered.  It isn't the same mini for both either.  Painting will make them look the same but I liked the different looks for each situation.

For anyone who's interested the character I created is a Deserter.  She deserted from both armies and I took the Wanted major hindrance. Added on top of that she's got a very distinctive revolver.  I think this is going to be a very fun character to play and the GM is happy with all the horrible things she'll be able to set up for my character.  I'm not afraid to make characters that are going to have trouble in the game.

Sunday, March 17, 2013

15mm Ready to Rebase

I made ~ahem~ a few mistakes when I started basing my 15mm for Lasalle.  The first mistake was basing for Lasalle.  I'm going to be basing for Napoleon's Battles - a classic set of rules with basing that will work with most other rule sets.  The second mistake was not sealing the wooden bases before gluing on the minis.  With wood glue.  These were the causes for the problems that made rebasing a necessity.

I live in a semi-arid climate.  I'm still not used to this on many levels.  Because the bases weren't sealed they absorbed a lot of the water from the glue causing some interesting but unwanted effects with the flock.  I ended up with a stripe all around the edge with no flock.  The other problem was the the whole reason for doing a glue base on top of the main base is so that if the base gets dropped there's a good chance the entire set of minis will pop off with the glue and cause less damage.  This does not work when the wood glue adheres wonderfully to the base.

Removing them was a chore, to say the least.  These are AB minis and have tiny little ankles.  One of the ones waiting to be based is already broken off at the ankles and will be reattached soon enough.  I'm quite proud to say that I removed all 64 minis without breaking any or breaking off the bayonets.  There's some bent bayonets but I won't straighten them out until they're on their final base.


Yes it looks like the terrible aftermath of a battle and in some ways that's what it was.  The pile of wooden pieces to the right are what's left of the original bases.  I couldn't soak them well enough to pry them off the bases without the real potential for damage so I started breaking and peeling the bases from the bottom to pull the support away from them.  I did soak them a few times and the glue did soften up the in the process.  I will give lots of good press for Litko plywood bases.  They didn't want to be destroyed and it took some effort to do so.  I also couldn't use the attached figures as a grip so it was an interesting project for the evening.

I need to get a can of black spray paint to seal the new wooden bases and hope to do that today.  I think I've got enough finished minis for at least 30 infantry bases.  I also need to pick up some storage for them.  Since I need containers that are around 2 inches tall it will be easy enough - that's a standard depth on a lot of them.  I can pick them up in stages since I'm going to get larger containers for these.  I also need to make movement trays and that will help keep them from sliding around in the containers.

As you can tell I'm getting ready to start painting these again.  The goal is to get all the infantry done before changing over to another project.  Mixing it up keeps things interesting.

Tuesday, February 26, 2013

I'm still doing stuff!

I've been doing a lot of painting and not a lot of taking pictures.  I need to correct that.

I've also got an interesting assembly to do since I want to make the ship modular with rare earth magnets and it's not quite designed for that like a simple turret attachment.  The ship is nifty but it looks fragile for transport and kind of tall for my case.  Wish me luck on that one and I'll try to take pictures as I go.

So far I've got most of my Dystopian Wars naval models painted along with a couple of air ships.  I'm leaving the land forces for later.

Pictures soon!  I promise!

Sunday, February 3, 2013

A brief update

I've got almost all the navy Dystopian Wars ships painted.  I'm waiting on a replacement part for the carrier and in the meantime I've failed my roll against temptation for painting the airships that I have.  It's not many and the sky fortress seems to have some good tactical value against Russians.  The gaming group has a lot of Russian fleets.  I'll be posting pictures in batches in the near future.

This is the current state of my table.  I finally found the missing dungeon crawl minis that my friend Michelle is going to be painting for me.  We've done a barter and this means there's a chance that they'll get painted.  I'm only sending her the nasties and not even all of those.  Barter does have its limits.  We haven't done the final negotiations.  I didn't post a picture of the ones that are ready to be painted.

On a final note I'm getting the Hirst Arts kits to make the old WizWar boards.  I bought the wizard minis and I'm looking forward to doing a straightforward build again.  The painting seems to be tedious but I'm thinking it will be a good chance to try my airbrush.  There's also some fun accessories to make.

A quick status shows that I still have 6 1/2 armies to paint (the CoA one I've been painting counts as 1/2 done to me), the dungeon crawl and now WizWar.  Yeah.  Plenty to keep me busy.

Wednesday, December 19, 2012

Dreadnought is done!

These things might be futzy to paint but they're also quick.  Relatively speaking, that is.   Then again I'm painting to a tabletop level and I'm trying to impress anyone but me.

It may not come across well in the pictures but the ring on the back of the ship and the "windows" on the particle accelerator on the bridge are painted in a blue-green.  Looking at the pictures it seems to be too close to the blue on the rest of the ship but in person it does stand out.

You can see the turrets in the background.  Once I get this one varnished I'll take some pictures with the turrets in place and with some of the escort ships.


Tuesday, December 18, 2012

Dreadnought half way done

I decided to move on to one of the larger ships.  Because they look cool.  Turns out they used all that space to put details everywhere.

This ship has 2 different types of turret - regular ordnance and energy weapons.  I decided to magnetize the turrets so I could swap them out.  I also decided to magnetize the bridge section so it would be shorter.  I was careful but not careful enough.  Of course I screwed up the polarity of one of the magnet pairs.  Luckily it was the bridge so I'll epoxy it down when the ship is painted.  Lesson learned because the battleship can run immersed and the bridge section is put into a clear template.


The plan is to put a wash into the circular part on the bridge and paint the ring in the back to represent Element 270.  Which means blue-green.  Otherwise it's going to be lots of the light blue wash in all the nooks and crannies.

Thursday, December 13, 2012

Ships - Fini!

Gee, once I figured it out these painted up rather quick.  The trick seems to be KISS.  Good painting skills are still essential since brush control is important due to the amount of detail that doesn't get painted.  It makes sense, really.

Step 1 - Base coat and metal

I put a white base coat over everything.  Go with thin coats so the detail doesn't get clogged up.  Then I painted everything that would be metal.  And after that I touched up the white to clean up where the paint went awry.


Step 2 - Brown wash

The deck and the metal was given a brown wash.  The deck got touched up a bit where it dried spotty.  The brown wash also took care of lining those areas that needed it.  The last steps were using the brown wash in the details to make them stand out more and touching up the white.  Again.


Step 3 - Blue shadows

I wanted to do a cool blue-toned white.  That's why the first attempts had blue hulls.  I achieved the same type of effect by using a pale blue in the shadows.  And I touched up the white.


Step 4 - Element 270 (Sturginium)

The fluff has the magic rock as a glowing blue-green.  I wasn't going to do OSL on these so I put a dot of the color in the bottom of the smokestacks.

Monday, December 10, 2012

Ships - I didn't get it

Last night I started work on the hulls. My intent was to bring up the white with washes.  Turns out I was incorrect in my technique.

Once again I have discovered that the ways I paint minis are not suitable for these kind of minis.

I'm going to test the idea of how I'm going to get a shadow on these without having a darker base coat.  Since they will be taking another trip into the Simple Green I can test directly on the minis instead of getting to that point and finding it won't work.

I'm not thrilled about redoing these minis a third time but I also knew that I would be using them as a learning experience.  Oh, I've learned all right.

I'm also going to try changing the deck color to something lighter so the metal stands out.  The one I have now looks great but it's too close to the brass and when they're together nothing stands out.  I have a couple of ideas and I'll test them before I start over.  I'm debating between a very, very light tan or plain white - both with the brown washes.   I think I know which one will look better but I have to try them both to be sure.

On a better note I received my rare earth magnets so I can plan on starting the larger ships once I figure out the painting methods.  I'll be using magnets to hold the airships on the flight stands (removable for storage) and for the alternate weapons available to ships.  I'll probably keep the bridge separate as well since they came that way.  It will also make the ships less prone to damage during transport.

Ah well.  Live and learn.  Then blog about what went wrong so other people can use what I've done.

Saturday, December 8, 2012

Ships, Take 2

This time I think I got it.  Fewer colors, more washes.

For the hull I'm going with a blue base coat so I can work it up to white.  This hasn't changed from the original color scheme.


You can see the wash around the parts that are going to be gold, once I get to them.  I wanted these to stand out.  You'll also notice the rivets didn't get the same treatment. See my previous post about getting too caught up in the details.


This is the wooden deck.  I do like the way the space between the boards pops when I added the brown wash.  Two coats of wash because the first one just didn't have enough emphasis.  Not all the ships have a wooden deck but for those that do this will work nicely.

Everything that is still white and some parts that are blue got painted with the metallic base coat last night.  I need to touch up a few places with the original blue and then I'm ready to do finishing work.  Yes, finishing work so soon.  I did say I was overworking these paint jobs the first time around.

Monday, December 3, 2012

Painting little ships is .. different

Sorry - no pictures just yet.  I'm not ready to post progress.  I do have a reputation to uphold after all.

I'm still working on the Spartan Games Dystopian Wars Covenant of Antarctica frigates and I'm using them as a test of the color scheme and how to paint the things.  Already I'm finding out what details are important to paint and which ones aren't.  So I've "wasted" a fair amount of time painting bits that I'm now painting over.  Learning experience, right?

That's why I started with the group of frigates.  They're small enough that they'll get lost in the mass of ships and painting a set of them lets me see how it all works.  I'm not exactly happy with them but not unhappy enough to strip and start over.

I think the color scheme is going to work well once I get through the process.  I'm going with blue-white (to match the faction flag) and I'm trying something new to me.  I have a light blue that is both the darkest color for the white and the lightest color for the blue.  I don't think I can get much more coordinated than that.

By the way - silver rivets on white are NOT worth the effort.  I shall not be making that effort/mistake on the rest of them.

Once this army is done I picked up a Russian Coalition one.  If I match their flag I'll be painting red and black.  Two difficult colors I would never use in an army.  Or a navy.  Or an air force.  We all know I'll find a way to work them in at least as accent colors but geez.  Red and black?

Friday, November 16, 2012

Happy early Christmas to me

I only get presents if I buy them for myself.  That's the way it goes.  I decided that I didn't need anything this year so I wasn't planning on anything.

Having said that it seems like I bought myself some early presents.  The guys here have been playing Dystopian Wars and I figured I might as well get an army and give it a shot.  My present to myself is the rulebook and an army.  Yes, another army to paint.

I've been wanting to paint up vehicles and this is the perfect game to do that.  I'll have to see if there are canon color schemes or if I can just have fun.

This might also be a chance for me to play with my airbrush.  I've got some 40K vehicles that could benefit from it as well.  And maybe some Litko bases since I'll have it set up.

I believe this makes army #5 in need of paint.  And my dungeon crawl minis.

Thursday, August 2, 2012

I painted!

Actually I painted twice but I don't consider a black ink wash "painting".

Tonight I pulled out the kobolds I started painting about a year ago and finally fixed the colors.  I picked the wrong color way back in the beginning for part of the figures and then stopped painting.  I thought fixing and finishing those would be a good way to get started again.

Tonight was just the base coat to start those areas again but it's progress.  I think I need to get stronger reading glasses to paint now but that's just a trip to the dollar store.

Did it feel good to paint?  Kinda.  Not being able to see them as well as I used to was frustrating and repainting is never fun.  But it's a start and that's what matters.  These are dungeon crawl minis so I'm not overly concerned about a bit of stray paint.

Sunday, July 15, 2012

Sneak peek

OK, this is more of a "sneak look at it" than a peek but what the heck.

This may or may not have something to do with my super secret project.


So how do these compare to this?