Really? You think you're ready to jump into the wild and wonderful world of 3D printing?
This is where the GM asks "Are you sure?"
Because here's what I've been dealing with on one of my printers. They're the same brand, same version, same pretty much everything. I say 'pretty much' because there are some differences.
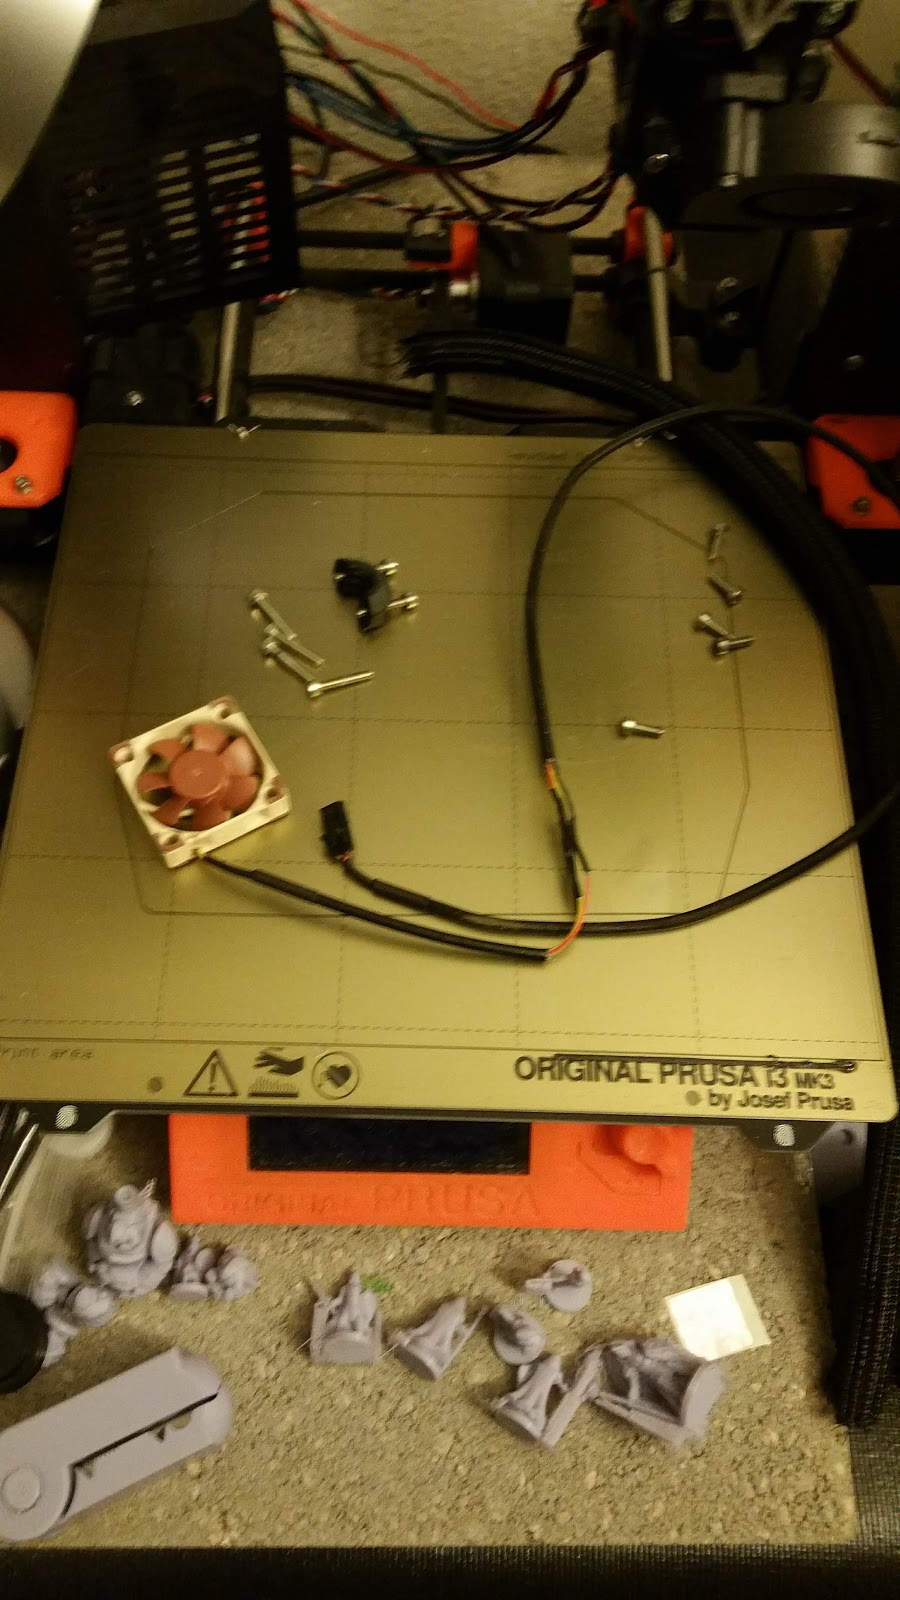
A little while ago I had one of the print head fans die on me. No big deal. I had a replacement on hand. Take the old one off, unwrap the cable harness, swap the cables, put the new fan on. It's not that difficult. However...
The fan model I got was the one recommended at the time. If you're interested it's a Noctua. And it even comes with a handy adapter pack! Of course none of the adapters fit my printer. No matter. I have a soldering iron. Clip, solder, heatshrink tube. I'm ready to go!
Fan goes on fine and tests fine.
Then I start getting clogging on various filaments at various times. The same filaments work fine on the other printer. I was annoyed and frustrated. There was a clog serious enough I had to take the print head apart and drill out some of the filament. More on that spool later.
I put it all back together and it's still being inconsistent. Which means I'm down a printer.
I wonder what the previous owner did to this and if the heat transfer isn't quite right. Clogging can be caused by that. So I take the hot end apart AGAIN and put fresh thermal paste on one piece, carefully putting it all back together.
Then it hits me. There had been posts about the Noctua fans but I couldn't remember them. A little searching in one of the Facebook groups and asking the guys in the moderator chat tells me that the Noctua fan doesn't push enough air, causing things like clogs. Sigh.
Luckily I had bought new fans for the pending upgrade, including one as a spare. This isn't quite as involved since it's a fan swap (again). Off with the Noctua, on with the Sunon. At least this one is a pretty black instead of the weird tan and flesh color of the other one.
Since I had the print head disassembled I have to calibrate it again. The full deal, not just the minor one. This includes setting the nozzle height from the base bed manually (you literally use a flashlight to see the space between the nozzle and the print bed) then adjusting the induction probe to a certain height. Only then can you run the software to calibrate. Three tries later (changing NOTHING, btw) I get it to pass calibration. But I'm not done yet..
It still needs to be fine tuned to the print bed. In our world that's called a Live Z since you can adjust the height of the first layer while it's printing. Live. On the Z axis. Pretty cool, right?
Ok. Fine. I have a little file to do this. I load up the printer and the new fan is spinning away. Yay. But the print is coming out in these little dots. Sigh. Nozzle clog. Unload the filament and get out the cleaning filament. That's just nylon, really, but it prints hotter so up the temperature and load the cleaning filament.
This is the point where it would hesitate then start extruding a nice thick line of cleaning filament. Nope. Not this time. There's more of a clog. So a cold pull it is. Set the temperature to where the filament will be solid then wait. Once it's cooled down pull the filament back out, hopefully capturing any stray bits that were hanging around.
Why didn't any of this show up when I had it in pieces? I didn't do a cold pull because I honestly didn't think I had a clog of this nature. They're not that common. The new fan doesn't do squat when there's a solid piece of something physically blocking the 0.40mm opening of the nozzle.
The first cold pull showed a chunk of the last filament I tried to print was hanging around in there. So back up goes the temperature and another cleaning filament load. Nope. Still clogged. Time for a second cold pull so down goes the temperature. The cleaning filament isn't showing anything obvious but it's also not the pretty point I want showing a clear nozzle.
Back up goes the temperature for another cold pull. This time I'll manually feed the cleaning filament until I can see it coming out the nozzle then drop the temperature to pull it back out. A lot of this time is spent waiting for the nozzle temperature to get to where I want it.
While I'm waiting I'll remind you of the temperatures. The printers are in metric so the temperatures are in Celsius. My normal printing temperature is 220C (428F). The cleaning filament works best at 265C (509F). The 'drop' is to 180C (365F). It's easy to forget just how hot these run until you do the math or do something stupid like grab plastic that came right out of the nozzle.
Third run with the cleaning filament. Back up goes the temperature. I'm going to let the print head feed it this time and see what happens. And it's still clogged. Back down goes the temperature. This one also shows as inconclusive. I'm not seeing anything in there but I'm also not seeing the right shape to the end of the filament.
I'm done for the night. I can only do so much before it gets too frustrating to continue. Other people may have more patience but after a long day at work and then putting the printer back together I can only do so much troubleshooting.
Tomorrow I'll work more on figuring out what's going on with the filament not feeding and make a new post about what's going on.
The other printer is chugging along nicely, printing Star Wars: Legion terrain for someone.
What does this have to do with a desire to buy a 3D printer? I'm detailing this to give you an idea of some of the things you WILL have to do at some point. These things are great, until you have to break out the tools to figure out what's not working right. If you're not a patient person and you don't like to tinker with things then you're not going to enjoy your printer.

Showing posts with label assembly. Show all posts
Showing posts with label assembly. Show all posts
Thursday, July 25, 2019
Sunday, May 5, 2019
A Very Productive Weekend
It wasn't as productive as I hoped but I'm very happy with what I got done.
First off - basing sand for miniatures. Long, long ago I bought a pound of something called 'decor sand' at a garden store. It was sand with a mixed grade of granules so there was some really nice variety in there. I used it on my minis to much success. But then I ran out. I couldn't find anything local and made a make-do mix of sand and talus.
When I went back to the Midwest for a friend's wedding a few years ago I went back to the store with the intention of bringing home several pounds of it. Sadly they no longer carried it.
I continued to limp along until I saw one of DM Scotty's videos where he recommends construction sand for that exact thing - far more irregular mix of sand for basing. I was happy!
Construction sand only comes in forty pound tubes. That's a lot of sand. I did get a broken one at a seventy percent discount and it sat in the trunk of my car for months. Mostly because I literally had no way to carry it to the apartment. It was very precariously bagged.
Finally this weekend I used the sifter I printed (I checked the manufacturer's description and found that the largest grit was far larger than I liked for minis and printed a sieve of appropriate size) and separated all the sand. I had to do it over two days because I ran out of storage containers and because it was getting dark on Saturday.

On the left, basing sand. On the right, rocks. Underneath, sixteen inch paving stones to go under the upgraded 3D printers and a broken cut-off wheel from the next listed project.

Yeah. I'm going to have to find a home for a lot of this sand. Because I have way too much of it even with the number of minis I need to paint. I'm still debating about that. There were a surprisingly small amount of rocks in the mix which makes me happy. It still leaves a lot of sand.
Next up was shelf support. The shelves I put in the craft/sewing/office room didn't have enough dividers. I used an extra set to add a level above what the intended size was so I really can't blame them. The top shelves were always intended to hold army transports both empty and full so that was going to need to be fixed.
I bought a four inch diameter pipe from Home Depot and needed to cut it down to the correct size. That pipe sat in the room for months. The shelves sagged more and more. This weekend it was remedied. The pipe was cut (combination of Dremel and hand saw) and the cut edge smoothed and chamfered. With only moderate profanity it was wedged into place and the shelving unit is now complete.
Before:

After:

Scary sag gone. I made sure the size would be enough to span all of the shelves and support them equally. No more worries about the top layer collapsing and the shelves breaking, much less what would happen to what was on them.
Next up was 3D printer related. One of the fans died and the replacement fan I had didn't have the correct connector. Correct fan, not correct connector. The solution is to solder the new fan onto the old cable. It's a known solution and not something that bothers most people. You can buy fans from 3D printer stores with the correct connector in place but I got mine from Amazon. I'd been putting off the project because I just didn't want to do it. That and my soldering skills are somewhat rusty.
Solder and heat shrink tube later and I have the new fan ready to be put into the printer. This is the one thing I didn't get done that I had planned. I was going to reassemble the printer and yes, I could have done it instead of writing this very long blog post. But I know my state of mind and would rather not have tried to reassemble it tonight. I know my limits. I'll do it this week after work one day.
Those are various and sundry 18mm miniatures I've printed along with a very handy nipper for cutting filament at the right angle to load into the printer. I printed that too - except the razor blade inside. It's also darn good at nipping incautious fingers.
Last but not least was something for me to do while I had all the stuff out to cut the support pipe. A future as of yet not disclosed project needs a rubber squeegee. It needs a small rubber squeegee. Shopping for the correct kind of rubber squeegee (I like the word 'squeegee' it seems) had me asking if I was in the wrong line of work.
Ingenuity to the rescue.

This is 3 squeegees cut down from a dollar store bathroom shower squeegee. They will work exactly the same and cost significantly less. Even better is that I can replace them very quickly.
So that was my productive weekend. I also made a trip to the not-so-local but much friendlier game store to buy the new Chessex dice that were released last week. As I warned them I ended up not buying two of the styles because they weren't attractive enough for me. These dice have swirls of color and it's very subjective. I did get two sets of another style (one to leave as-is for the collection, one to repaint the numbers a more pleasing color) and two sets from the case. One set is trade/sale fodder, the other is a nicer version of one I already have.
It might not sound like much but I did more this weekend than I've done in a very long time. I even spent a little time on the stationary bike in the apartment complex fitness room to try to make my knee feel better after standing at the trunk of my car sifting sand for far too long. It worked, along with the heating pad after.
I'm very proud of what I accomplished and the tasks I finished. I didn't just do things - I finished them. All the sand is sifted and my car trunk has been emptied. The support piece has been properly cut and finished then wedged into the shelves. Actually finishing tasks is something I'm not great at so doing so many of them in one block of time is something I'm going to put in the win column.
And during all that I had an idea for the blog to make more content that wasn't 3D printer related. I'll have to polish up the idea and see how it flies. Stay tuned. Better yet, follow.
Thursday, February 21, 2019
Kapton Tape Sucks
That was an attention-getting title. I'm not above clickbait.

Kapton tape is really kapton film with adhesive. This stuff is thin. Because it's thin it likes to twist, ball up, not go where you want it, and generally be a pain in any sensitive part of your anatomy you want to name.
I got the wires taped up. Moderate profanity was used. One large problem was that I was doing this without disassembling the extruder. Had I taken it apart it would have been much easier. But I went the lazy way.
I'm not sure that the part is good on one of the printers. It's still doing some temperature fluctuations but that's also happening when there's some really odd airflow patterns from the part fan.
OK. Let me explain that one.
There's two fans on the extruder - the hot end fan and the part fan. They both do what the names say - the cool different parts of the process. The hot end fan isn't nearly as powerful as the part fan and keeps things constant for the heater. The part fan is a tricky beast since it's trying to cool the molten plastic without cooling it too much. There's a shroud that fits the end of the fan and tries its best to direct the air where it should go.
When I had the shelf accident I think that the part fan on one printer took enough of a hit that the bearings went wonky. It certainly rattles when it's running.

The extruder fan is on the left. There's a hole in the extruder body to let the air in.
The part fan is on the right. The R3 upgrade put it at that angle. There's discussion whether the angle of the fan causes extra stress on the fan bearings or not.
The wires that I taped are those red ones. The tape is orange. The red wires are the nice, thick heater wires. The thermistor wires (the tiny ones) aren't seen here. But they're blue. And tiny.
I'm not replacing the fan yet for these reasons.
- It seems to be working;
- There's an upgrade planned in the near-ish future;
- Replacing it is a pain in the sensitive part of the anatomy (at the moment at least).
The reason replacing it is a pain is 85% the part itself and 15% me. After I do what I should have done when I last upgraded it then the split will be 95%/5%. Here's the problem. The fan is a generic notebook fan. Which is great, they're easy enough to find. But the wires are far too short for use in the printer. So that's on us.
Some people solder them. This is actually a replacement fan and I went the lazy way (go figure) of unsoldering the wires from the old fan and soldering them directly to the new fan. A little bit of futzy work but it's been fine. Going forward I was thinking I would solder them in the wire run instead.
The second printer is different. The previous owner put a connector on the wires. That way when you replace the fan you put a connector on the new fan and it's easy enough to replace it. Brilliant! I even got those same connectors. That way I would have both in the same configuration.
I didn't put the connector on when the printer was nicely in pieces. I was going to do it but went "Eh" and didn't. Now I'm paying the price for it. If I could replace it that easily I would do so. I have plenty of spares. It's more of a chore to do it now when the wires are bundled up.
Enough technical talk!
I did do some printing but that large print that failed kind of burned me out for a bit. That's another reason the printers are idle. I needed a break. I really enjoy printing but it was wearing on me to have them going all the time. I did do a test print on each one and that's how I know what's going on with the thermistors. But for now I'm letting them be idle.
On a better note I have the temporary camera stands printed and assembled. The next/last step is connecting them to the print servers and setting them up for monitoring and time lapse videos. Of course there's more steps than that but it's the general idea.
There's ALWAYS something to do when you have one of these things. Image it with two...
Thursday, February 14, 2019
The Printers are Idle
What? The printers aren't printing? What's wrong? WHAT'S WRONG?
Actually there is something wrong with both of them. It's a minor thing but something I want to fix properly before getting them up and running again.
This guy put one printer on idle:

See that part sticking out in front, on the top? Yeah. That guy. For whatever reason it caught on some wires you can't see on the other side of the print head. Those are some thin wires that really should be protected better. In and of itself that wasn't the problem. When it caught on those wires it made the print head hang when it goes side to side. When it freed itself it was in the wrong place but didn't know it. It continued to print but the layers were now about an inch to the right.
That's called 'layer shift' for very obvious reasons. And that ruined a print that had been running for over twenty four hours. I'm still going to send it to my friend because he's crafty enough he can use it to make something else.
The other printer has been having trouble with that same component but for different reasons. I've been able to print decently even though it's a problem. But since I don't have anything pressing to print I decided to idle them both and fix the darn thing once and for all.
My solution is going to be to tape those wire to the much larger ones running along side them. That serves a dual purpose of keeping them safe and keeping them out of the way. Which I guess is the same purpose really. But I'll call it two reasons.
Here's the next question. What do you use to tape something when it's right up against a block of metal being heated up to about 220 degrees Celsius? For those of us using imperial measure that's over 400 degrees Fahrenheit. Regular old electrical tape isn't going to do it here.
There's a special tape meant for high temperature use. There's a piece of it holding the heater in place under the print bed. Of course I don't have any on hand so an Amazon order was placed. In case you want to know this is kapton tape and it's used in a lot of places where high temperatures are around. It's good to have some on hand anyway. At least if you have a 3D printer it's good to have on hand.
When it arrives I'll test that the parts are working properly (heat it up, wiggle the wires, watch the temperature) and replace what is bad. Then I'll carefully align the sets of wires and spiral wrap tape them together until they pass the problem area. After that they go into the main cable bundle that's in a textile sleeve.
Until then the printers are sitting here. I unloaded the filaments so they're truly idle and kind of sad to see.
I'll have them running for a couple of months and then my next upgrades happen. Those are going to be a doozy. I'm upgrading the entire frame to extruded aluminum and there's an upgrade from the manufacturer as well. All new plastic parts will be printed. At the same time I'll do the routine maintenance I've put off. These things are literally going to be stripped down to parts and rebuilt in the process.
And I'll be spinning that design around so the sticking out bit is around back and less of a hazard for the wires when I print it again.
Saturday, January 19, 2019
A Day in the Life of 3D Printing
This is not a typical day. A typical day for me is simply printing. Print, remove parts, change filament, clean bed, print some more. It works great. I get lots of stuff done.
However..
There are those days when that doesn't happen. I have an entire bin of spare parts just in case something goes south. I haven't yet printed a spare set of printer parts (yes, you can do that) but it's on the list.
Today was one of those days when it didn't happen.
The overnight prints finished just fine. I took those off the printers and was my normal less-than-graceful self. I hit the shelf that stores about twelve rolls of filament. Twelve rolls at one kilo each. Turns out I hadn't secured the shelf brackets properly and the whole thing came down.
My head got a bit of a bump from the shelf but nothing serious. Because I was leaning over the shelf mostly fell on my back to little effect. But now let's take stock of the damage.
Overall this doesn't sound too bad, right? A broken part is probably the worst but the rest is minor or can be replaced?
It took both printers out of commission. The one without the broken part needed to be fully calibrated again (note - I replaced a screw that had fallen out of the bed frame so that may have messed with the alignment too) and I couldn't print the replacement part until then.
After FIRMLY hammering the shelf brackets into place and putting the filament back I assessed the damage and decided I didn't want to deal with it at the moment. I needed a new power supply anyway so it was off to the computer store. That would be a nice break. I got that and some replacement filament I had been considering anyway.
When I got home I took advantage of the situation to more properly deal with the power cords. I have a UPS but it was just sitting on the floor as a temporary measure. I decided to wall mount it. I measured several times. I put the wall anchors and screws in. I had them in the wrong place. The UPS fits nicely sitting behind the printers, across the tables. So that's where it is.
Again taking advantage of the situation I did some minor repairs I had been putting off. One of the cable bundles wasn't quite secured well enough so I redid that. And the screws for print server case that had gotten bopped weren't long enough, which is why the cover fell off so easily. Longer screws were used.
I used a replacement for the broken filament holder and got that in place. Note - print another replacement. Then I went through the four step process of calibrating the printer again. It takes some time and by the last step you're dealing in fractions of millimeters. But it's done.
Now I'm printing the parts I need to fix the other printer. Once that's done I'll run the four step calibration on that since I'm sure at least one roll of filament bounced off that print bed. When that's done I'll have both printers running again.
What's left? Reprinting the filament holder piece I pulled from spares. And that's about it. Overall it could have been much, much worse. I was very lucky that more of the rolls of filament didn't hit the printers. Bent rods and broken controller boards could have happened. But they didn't and it's a series of minor but necessary steps to get them both working again.
This is the side of 3D printing that a lot of people don't understand. It's not a matter of plugging it in, running a wizard, and printing. There's a lot of futzing that goes with getting the printer ready to go and then keeping it running. I'm not one of those people who tears down their printer and rebuilds it in a different color just for fun. Yes. There are people like that. But there's still more or less constant tweaking to be done, improvements to be made, and generally wondering if you're going to get a print or have the hot end encased in a blob of hardened plastic.
Technically I lost a day of printing because of this. Not even technically. I lost a day's worth of time I could have been printing. I'm not under any hard deadlines so this day isn't going to cost me anything. But I realized how much I dislike having the printers sit idle. There's always something I could be printing and not being able to do it rather than not doing it by choice is very frustrating.
However..
There are those days when that doesn't happen. I have an entire bin of spare parts just in case something goes south. I haven't yet printed a spare set of printer parts (yes, you can do that) but it's on the list.
Today was one of those days when it didn't happen.
The overnight prints finished just fine. I took those off the printers and was my normal less-than-graceful self. I hit the shelf that stores about twelve rolls of filament. Twelve rolls at one kilo each. Turns out I hadn't secured the shelf brackets properly and the whole thing came down.
My head got a bit of a bump from the shelf but nothing serious. Because I was leaning over the shelf mostly fell on my back to little effect. But now let's take stock of the damage.
- The power supply for one of the print servers was broken
- One side of a filament holder was broken
- The metal tin holding small tools and nozzles was dented beyond repair
- The other printer had a part broken
- One side of the cover of a print server was knocked off
- A metal mesh cup for various tools was squashed a bit
Overall this doesn't sound too bad, right? A broken part is probably the worst but the rest is minor or can be replaced?
It took both printers out of commission. The one without the broken part needed to be fully calibrated again (note - I replaced a screw that had fallen out of the bed frame so that may have messed with the alignment too) and I couldn't print the replacement part until then.
After FIRMLY hammering the shelf brackets into place and putting the filament back I assessed the damage and decided I didn't want to deal with it at the moment. I needed a new power supply anyway so it was off to the computer store. That would be a nice break. I got that and some replacement filament I had been considering anyway.
When I got home I took advantage of the situation to more properly deal with the power cords. I have a UPS but it was just sitting on the floor as a temporary measure. I decided to wall mount it. I measured several times. I put the wall anchors and screws in. I had them in the wrong place. The UPS fits nicely sitting behind the printers, across the tables. So that's where it is.
Again taking advantage of the situation I did some minor repairs I had been putting off. One of the cable bundles wasn't quite secured well enough so I redid that. And the screws for print server case that had gotten bopped weren't long enough, which is why the cover fell off so easily. Longer screws were used.
I used a replacement for the broken filament holder and got that in place. Note - print another replacement. Then I went through the four step process of calibrating the printer again. It takes some time and by the last step you're dealing in fractions of millimeters. But it's done.
Now I'm printing the parts I need to fix the other printer. Once that's done I'll run the four step calibration on that since I'm sure at least one roll of filament bounced off that print bed. When that's done I'll have both printers running again.
What's left? Reprinting the filament holder piece I pulled from spares. And that's about it. Overall it could have been much, much worse. I was very lucky that more of the rolls of filament didn't hit the printers. Bent rods and broken controller boards could have happened. But they didn't and it's a series of minor but necessary steps to get them both working again.
This is the side of 3D printing that a lot of people don't understand. It's not a matter of plugging it in, running a wizard, and printing. There's a lot of futzing that goes with getting the printer ready to go and then keeping it running. I'm not one of those people who tears down their printer and rebuilds it in a different color just for fun. Yes. There are people like that. But there's still more or less constant tweaking to be done, improvements to be made, and generally wondering if you're going to get a print or have the hot end encased in a blob of hardened plastic.
Technically I lost a day of printing because of this. Not even technically. I lost a day's worth of time I could have been printing. I'm not under any hard deadlines so this day isn't going to cost me anything. But I realized how much I dislike having the printers sit idle. There's always something I could be printing and not being able to do it rather than not doing it by choice is very frustrating.
Friday, January 4, 2019
3D Printer = Frustration
When they work they're great. When they don't work then it's almost complete frustration because of all the things it could be.
My latest upgraded printer (The 3D Printer) is working just fine except for the fact it won't keep a constant temperature at the nozzle. This could be one of several things even though the actual heating process is simple.
The heating cartridge could be loose or bad.
The heating cartridge wires could be loose or bad.
The thermisor (temperature sensor) could be loose or bad.
The thermistor wires could be loose or bad.
Something else could be wrong.
Luckily the plastic I prefer is very forgiving. I could still get a pair of large floor tiles done. But then I put it through a torture test print (Note 1) and still got the temperature issues.
First round of testing!
Tighten the screws. Yup. Just tighten them. But not too much on the thermistor or you can crush it.
First round results? Temperature fluctuations when I move the wires.
Second round of testing!
Heat it up and tighten the screws some more.
Second round results? Temperature fluctuations when I move the wires.
Verdict?
I looked at how I bundled the cables and the connector for the thermistor isn't really well secured. So it's moving when the print head moves. That moves the thermistor wires. That's not good.
Wrapping the cables again so that wire and connector were firmly held got the temperature rock solid stable. I made a post with screen shots of the temperature differences for others to see if they're having problems.
Welcome to the glamorous world of 3D printing.
Note 1 - A 'torture test' print file is one that is meant to test the limits of what a printer can do. It tries to do overhangs, bridges, small details, specifically measured parts, etc. It's a test of how well you've dialed in your machine. With this one I can't get an unsupported print to go more than 60 degrees without the bottom layer sagging. That's actually pretty good since 45 degrees is the recognized standard for when things start to need support.
Wednesday, January 2, 2019
The Way of the 3D Printer
It's not some kind of philosophy. It's more like a continual series of headdesk moments with an occasional facepalm for good measure. Welcome to the future?
I did get the replacement board for my first printer I was upgrading. Note - it may have been as simple as a crossed wire but I wasn't going to take it apart again to find out. And I had already put the new sticker on it with the board serial number. So there.
I got it all connected again and the cables neatly wrapped. Which is required for putting it all back together. There was some cursing but not much since I've done this way too many times now.
I dragged it into the office where I put it on the stand where it will live.
Problem 1
The stands are too close together. I'm using TV carts without the wheels so they're low and small but still large enough for the printers and some work space. On top of that is neoprene shelf liner. And on top of that are concrete paving stones. The combination of concrete and neoprene is to reduce noise and vibration. It works.
I placed the pavers so they're on all the solid edges of the cart shells. That way the concrete is supported and vibrations are transmitted down the boards rather that resonating in the open space. Mostly I did it for the support of the solid edges. Concrete is heavy and these things are pressboard.
I can deal with it for the moment but I'll have to move them farther apart. That will take up more room than I wanted but only a few inches. Measure twice, do whatever once I guess.
Problem 2
I started up the self test on the upgrade (known as The 3D Printer, as opposed to The Other 3D Printer) and this time the fan spun. Yay! But it has the same problem as the other one with finding the X axis end stop. That's the sideways one. The new, better fan that keeps the heater from getting too hot is wider than the original and that leaves a gap between the body and the switch.
I had printed a shim for the other one. It worked fine. I can print a shim for this one. It will work fine. Except that The Other 3D Printer is into a long print job and will be working on it for another twenty one hours.
Therefore my adventures with the printer upgrade are at an end for the evening.
Summary
One more day won't hurt. It's been a while anyway. And I can calibrate it up tomorrow after I get that shim glued in place. There's more to do once it goes through the self test and I still haven't quite figured out how to get the print server to store files where I want them rather than where it thinks they should go.
I've said it before and I'll say it again. 3D printers are not plug and play. They're not for people who can't stand to tinker with things and won't accept that sometimes there's going to be delays and problems. Patience is required when caring for and feeding the beasts.
Once they're both in place I'll get a picture to share. The light and camera setup won't be in place but at least you can see these things that I'm going on about.
Tuesday, January 1, 2019
All Right Then
Airbrush
I have the compressor, the moisture trap/pressure regulator, the AIR HOSE, and all the air brushes where I can find them. The compressor et al is also set up where I think it's going to be when I'm using it.
The space for the booth has a piece of foamcore on it as a base for the photo tent/spray booth when it arrives. The turntable for inside the booth is sitting in a box but I can find it easily enough.
I haven't done any airbrushing because:
1 - It's been too freaking cold.
2 - Housework was needed.
3 - 3D printing.
That will change this week since the temperature is going up and the housework is getting done. About the 3D printing...
3D Printing
I was completely sick of printing grey and printing dungeon pieces. Printing grey dungeon pieces was excruciating. Therefore I took the holiday to print some stuff that wasn't grey and wasn't dungeon pieces.
I properly labeled all the test prints (low poly cats) with the brand and color of each one. I have the start of a filament cat army on the windowsill.
I also printed up useful stuff like a grip for painting miniatures, a clipper for filament (it has to be cut at an angle to be loaded), and a new case for the Raspberry Pi media server. I printed in colors! Pretty, pretty colors.
I also put up the last long shelf on the adjustable spacers and filled it with .. filament! That got the worst of it out of double rows under the printers. I also lowered the short shelf one notch so it fits all the types of boxes I have. That helps. A little.
3D Printer Repair
Absolutely nothing was done on this since the board is still in transit. It got to spend new year's eve in Germany but now it's on it's way here. It's still showing tomorrow as the delivery date but we'll see if that happens.
Since the order is a decent amount I need to sign for it. I certainly hope it shows up early because I was kind of planning on going to the post office and to the craft store after work. But if I'm waiting on the delivery that gets postponed.
Once the board is here I can restart the upgrade process and hopefully have it running by the weekend. That will be more grey dungeon pieces being printed but for a shorter period of time. Win some, lose some.
Convention
I'm still on the fence here. A big incentive for me is gone since there won't be a Chessex dice booth there. High cost and low profit were the owner's reasons for not showing up and those are perfectly valid. But I have a long shopping list and now I need to think about why I would go besides running my games.
BTW - the vendor list is currently almost empty. As in most of the spaces are showing as Available. If they haven't updated the website that's not a good sign. If that's true it's not a good sign.
My events are still showing as free even though it was supposed to be fixed a month ago. Their dashboard shows them at the correct price, the event ticket buying site shows them as free. I'm letting them work it out. Their systems are not my concern.
I'm giving it a few weeks to see how sales go. If it gets within a couple of weeks of the convention and there's very low or no ticket sales then I'm going to cancel. I know, I know. I committed to running the games. But if there's no one choosing to sign up then I won't be running games. I'll be sitting next to a table being bored. And having to pay for the privilege since I don't know if they reimburse for events that had no players. Actually I don't know their full badge reimbursement policy - commit to run the games or actually have enough players?
Housework
We're not going there.
Saturday, December 29, 2018
Is the Airbrush Worth All This?
So I have not just one but four airbrushes. I've never used an airbrush. Um. Actually I have five but one of them is going to be sold when I get around to it. So I don't count it.
I got the airbrush bug mostly for priming stuff so I don't have to be dependent on the weather and deal with aerosol fumes. Then I started seeing all the very nice things they can do with practice and foresight. Therefore I thought airbrushes were good things.
I didn't take into account my limited space. I really didn't. But I'm working around that. Or working in it. Whatever the phrase I'm still moving forward.
I have all the minis to paint for the dungeon crawl. I kind of neglected to think about that while I focused on printing up the dungeon. Whoops. Since these are full adventuring parties I need sixteen minis painted. Plus the three NPCs. I got them at the convention and they've sat in the bag since I got them home.
I ordered new triggers for all the airbrushes to make them more comfortable to use. Over Christmas I replaced the triggers on all four of them. I'm rather proud of that. I also took the time to completely disassemble each one and put it back together so I had that under my belt. All of them have the quick connect adapters as well. It's now a pretty sweet setup. Final triumph is that they all fit into the plastic bin I had gotten for airbrush stuff.
Last week I spent the time to find them, double check I had the right ones, carefully placed them in their parties, cleaned them up, assembled them, based them, glued them to 'bottle caps', sand based them, and added the gesso to the sand bases to glue it all in place. Overall they're ready to go.
Then I pulled out the air compressor for the first time and it does sit nicely on the kitchen counter where I planned to put it. Check.
I attached the pressure regular and moisture trap. I may have to use thread tape on it but for now it's attached. Check.
I looked for the air hose I bought that's brand specific and has the matching quick connect adapter. Um. No. Can't find it. And the search begins...
I looked for literally hours last night with no joy. I gave up and sulked. I also thought about where I could have put the stupid thing. There was a brief time when I thought about ordering a new hose and adapter but stopped myself because I don't NEED another one and can't use another one. That and they're not cheap.
Today I didn't get to looking again until later in the evening and dug through a lot of stuff. Finally, tucked away in a canvas bag, I found the stupid thing. Once I found it I realized that it was in the carry bag from when I took a fairly useless airbrush class at a regional game store. The airbrush was put away, the hose wasn't.
Check! Air hose on the compressor. Again it may need thread tape and I'll deal with that if needed. I know where the thread tape is.
The final thing was the photo tent I got to use as booth. I do have a portable booth but that thing is large and a pain to set up. I don't need heavy filtration for acrylic. A note on that later. The photo tent is one that folds down like the car sunscreens do so it's perfect for my space.
Except that it's not. I didn't think to measure so it's far too large to fit into the space I've allocated for a spray booth. Sigh. I needed a YouTube video to show me how to fold it back up (twist it all into the center and squish) and then I measured the space, converted inches to centimeters, and ordered the correct size. I'll figure out a use for the larger one at some point.
By the time all this happened it was way too late to consider doing anything. It was too late when I found the air hose. However I could continue to get it set up and that's how I found out about the photo tent.
Tomorrow I will be using a cardboard box as my spray booth because I have a very large number of them sitting in my living room waiting for a new home. There has to be one in an appropriate size in there. It's not perfect but it's better than a piece of posterboard or something.
Had I not found the air hose tonight I was going to use aerosol primer on the minis because I couldn't wait any longer. Now I can use the airbrush and I may even try putting down skin base tones with it as well. Those are always the first layer of paint and if I overspray badly it won't matter. I need to learn to do this and the best way is to just do it.
Ok. Some notes here. The 'bottle caps' are actually 3D printed ones that are supposed to fit the painting handle I haven't printed yet. It's a knock off of the Citadel one and was designed to fit these caps. The good news is that I can print as many of the darn caps and handles as I want. If they work.
I do have some other ones that use bottle caps and are on spools but I like this one better. While most people only have one that's because theirs cost a lot of money. Mine just take some printer time and a little filament. Plus I can print all the caps I need.
Churn Baby Churn
This poor printer is just running through kilometers of filament churning out dungeon pieces. I am personally very tired of grey filament. Very, very tired.
There should be two printers doing this, halving the time, but my other one is still down waiting for the replacement board I ordered this week. They haven't even shipped it. Sure, they're blaming the holidays but I need the stupid board. The printer is a doorstop without it.
And then I had a clog that was resistant to the normal methods of removal. It was kind of cool to see the filament extruding in two streams instead of one but that's not really the point. For the first time I used the acupuncture needle they include with the kit to try to move whatever little piece of gunk that was in the way to a place I could remove it.
Then it was a few rounds of cleaning out the nozzle (look up 'atomic pull' for the details) and then it looked like it was good. Although I didn't see the piece of whatever in the cleaning filament.
I 'lost' about twelve hours of printing because of this. I could have tried to clear it last night after the print finished but I was too darn tired to trust myself with printer maintenance. I know better. I'll give up the time to make sure I do it right. This morning I was there, swearing at the printer, doing maintenance.
I should do some calibration again and I think I'll do that when the other printer is ready to go. I will calibrate them both at the same time and then it's off to the races. At least off to 'printing the rest of the dungeon pieces'.
I have the lights for an LED torch wall section but I'm iffy on doing it now. At least I'm iffy on doing it for the convention dungeon. I have a legitimate reason. Hear me out.
The piece is rather clever. The part where the torches are is a separate piece you print in transparent orange (or yellow or whatever) and then there's holes in the back where you shove the mini LEDs. Overall it's a very efficient design using an off-the-shelf light string and battery holder. But here's the catch. That entire panel of torches is out of the transparent filament. So there's this line of orange in the middle of the stone.
This isn't a problem with the addition of that thing called 'paint'. But as of now I don't think I'll have time to paint it before the convention and I don't want to bring it primed because then there's fingerprints on the primer and I don't know how the rest of the paint will adhere. Right now it's all a consistent light grey. To use the LED torch walls I would have to paint the orange sections at least and then they'd stand out just as much as if they were still orange.
It's something I'm pondering. Once I find my airhose for the compressor (dammit I hate losing things) then I can figure out how long it would take to paint this. I can practice on scatter. I plan on using the primer as the main color and then just accenting it with some random bricks and overall drybrushing. And then there's varnishing. So it takes time. Time I could be spending painting the darn minis.
I might have to give up on the airbrush for priming and either use the rattle can or paint it on. I want to use the airbrush but I don't want to waste too much time looking for the missing hose. And before anyone suggests it I want this hose for a reason. It's brand specific so it's threaded properly, it's a braided hose so it's more flexible, and it has the quick disconnect adapter attached to match the quick disconnect adapter on all my airbrushes. It's not cost effective or useful at all to buy another hose and adapter. I'll look more tonight and if not tomorrow I bring out the rattle can and be annoyed.
Saturday, December 15, 2018
3D Printer Woes
I'll do my best not to get into the technical weeds here.
I was upgrading my first printer to the 2.5 version. It's not a difficult upgrade (as far as upgrades go) and the Prusa site is really good with instructions. Except for one thing they made a video for some reason but I digress.
I had put it off for a while because I didn't have the table clear for the upgrade and the printer was working. But then the plastic cover on the print bed started getting damaged and I had this other, working, upgraded printer so my excuses ran thin.
Especially thin because I had cleared enough space to fix the second printer when I bought it and even did a minor R2 to R3 upgrade at the same time.
I went through the instructions and only have one thing where I screwed it up. It doesn't matter that one of the motors is rotated by 90 degrees. There's replacement motors that have to be rotated so the writing is sideways and the wiring isn't stretched. I won't even see it much.
When I had it back together I started to test and calibrate it. It didn't pass the second test. One of the fans wasn't working. It worked before the upgrade! And now it didn't work!
Thanks to help from some really smart people online I checked everything and it turns out there's no power going to the pins that connect the fan. This is bad. This is expensive. This means that the controller board had something go wrong. Since the box that houses it got replaced I did have to move the board around but I was darn careful.
After confirming that everything worked except the fan (that I can tell) I contacted support. My printer is out of warranty so the person on chat couldn't just send me a replacement board, even though it went bad during the upgrade I did buy and should be in warranty. However he said to send an email and they would see what they could do.
The really smart people are now suggesting that I see if there's a solder break between the connectors and the rest of the board. So that's what I'm going to do when I'm less clumsy than I'm feeling today. That means unplugging the nest of cables and taking the board out. The cables are more of an annoyance than the 4 screws holding the board. But there's a good chance I can simply touch the soldering iron to one of the pins and let the heat do the work to resolder the join.
Luckily I know how to solder. And also luckily I've got really smart people who are willing to talk me through things like how to use the multi meter to check if there's power going to the connection. This was my first time working inside a live system and didn't want to do anything bad since it's connected to power. That's one fear down. Or at least minimized now.
I'm also taking this time to reprint some of the parts because I printed the first set on the not-upgraded printer and I'm not happy with how some of the nuts and bolts fit into it. I did a test and think that the upgraded printer gives a better result. Those are printing now.
Yes. You print parts to use on the printer. Even the upgrade comes with one printed part (high temp plastic that most people don't print at home due to it being fussy and having fume issues) and a spool of the kind of plastic the rest of the parts need. The instructions have the link to the parts files. Which means you need a working printer (or a friend with one) to upgrade your printer. It's a little wacky.
The upshot of this is that the second printer I bought is still doing all the work and the first printer decided to hiccup while I was upgrading it. Since the board isn't working anyway I can't hurt much by trying to reconnect the fan pins with a soldering iron. And it makes me want to learn more so I can help other people fix their printers too.
Sunday, March 17, 2013
15mm Ready to Rebase
I made ~ahem~ a few mistakes when I started basing my 15mm for Lasalle. The first mistake was basing for Lasalle. I'm going to be basing for Napoleon's Battles - a classic set of rules with basing that will work with most other rule sets. The second mistake was not sealing the wooden bases before gluing on the minis. With wood glue. These were the causes for the problems that made rebasing a necessity.
I live in a semi-arid climate. I'm still not used to this on many levels. Because the bases weren't sealed they absorbed a lot of the water from the glue causing some interesting but unwanted effects with the flock. I ended up with a stripe all around the edge with no flock. The other problem was the the whole reason for doing a glue base on top of the main base is so that if the base gets dropped there's a good chance the entire set of minis will pop off with the glue and cause less damage. This does not work when the wood glue adheres wonderfully to the base.
Removing them was a chore, to say the least. These are AB minis and have tiny little ankles. One of the ones waiting to be based is already broken off at the ankles and will be reattached soon enough. I'm quite proud to say that I removed all 64 minis without breaking any or breaking off the bayonets. There's some bent bayonets but I won't straighten them out until they're on their final base.

Yes it looks like the terrible aftermath of a battle and in some ways that's what it was. The pile of wooden pieces to the right are what's left of the original bases. I couldn't soak them well enough to pry them off the bases without the real potential for damage so I started breaking and peeling the bases from the bottom to pull the support away from them. I did soak them a few times and the glue did soften up the in the process. I will give lots of good press for Litko plywood bases. They didn't want to be destroyed and it took some effort to do so. I also couldn't use the attached figures as a grip so it was an interesting project for the evening.
I need to get a can of black spray paint to seal the new wooden bases and hope to do that today. I think I've got enough finished minis for at least 30 infantry bases. I also need to pick up some storage for them. Since I need containers that are around 2 inches tall it will be easy enough - that's a standard depth on a lot of them. I can pick them up in stages since I'm going to get larger containers for these. I also need to make movement trays and that will help keep them from sliding around in the containers.
As you can tell I'm getting ready to start painting these again. The goal is to get all the infantry done before changing over to another project. Mixing it up keeps things interesting.
Sunday, February 3, 2013
A brief update
I've got almost all the navy Dystopian Wars ships painted. I'm waiting on a replacement part for the carrier and in the meantime I've failed my roll against temptation for painting the airships that I have. It's not many and the sky fortress seems to have some good tactical value against Russians. The gaming group has a lot of Russian fleets. I'll be posting pictures in batches in the near future.
On a final note I'm getting the Hirst Arts kits to make the old WizWar boards. I bought the wizard minis and I'm looking forward to doing a straightforward build again. The painting seems to be tedious but I'm thinking it will be a good chance to try my airbrush. There's also some fun accessories to make.
A quick status shows that I still have 6 1/2 armies to paint (the CoA one I've been painting counts as 1/2 done to me), the dungeon crawl and now WizWar. Yeah. Plenty to keep me busy.

This is the current state of my table. I finally found the missing dungeon crawl minis that my friend Michelle is going to be painting for me. We've done a barter and this means there's a chance that they'll get painted. I'm only sending her the nasties and not even all of those. Barter does have its limits. We haven't done the final negotiations. I didn't post a picture of the ones that are ready to be painted.
A quick status shows that I still have 6 1/2 armies to paint (the CoA one I've been painting counts as 1/2 done to me), the dungeon crawl and now WizWar. Yeah. Plenty to keep me busy.
Tuesday, May 8, 2012
I built stuff
Yes, I built stuff. And I painted stuff last weekend too.
I have a gothic arena that I started back in 2009, I think. It may have been 2010. Whatever. It was a while ago and it has been sitting, rather forlorn, in a box. I needed to feel productive so I pulled it out to paint. I also have some additional pieces for my modular dungeon that I built almost a year ago and never painted.
While I was painting I found some of the arena pieces weren't as well constructed as I would have liked and some had been damaged in the moves. Tonight I dug out the bins of appropriate bricks and built not only the replacements but a couple of new ones. I'm mixing the basic and advanced arenas so eventually I need to figure out what's left to build. I think I have all the basic pieces.
Here's proof I built.

It takes a heck of a lot more glue than you would think to build this stuff. I probably should have thrown that out before taking the picture.
I do a lot of building on my homemade magnet board. That's a steel baking pan sitting on a piece of countertop. (I used to be able to buy the sink cutouts - fantastic for solid surfaces). The pieces of wood have magnets glued into holes - you can see one of them upside down in the upper right. I can't remember where I found the instructions to do that. I do remember the time it took to align the radial arm saw to as close to a perfect 90 degree cut as possible. That took a while but it's worth it.
I also build using my Lego as braces and alignment blocks. To be honest mine are Brix Blocks, the Sears equivalent to Lego. I've had them since I was a kid and I'm still playing with them.
I'll let these dry for a few days and then probably put paint on them this weekend when I do the touchups on the pieces I already base coated. And the touchups on the pieces I touched up when I painted last weekend. At some point I do move beyond the base coat. Really.
Tuesday, August 9, 2011
Quick updates, no pictures
Sorry - no pictures right now. Nothing really picture-worthy at this point.
I did base up some of the 15mm so they would be safe and take up less room. Unfortunately the basing glue and flock shrank oddly so now I have to figure out how to fix it. I'm still trying to figure that out since I'll need to make sure the rest of the army matches. And there's no way to remove the minis from the base and start over.
I have over 100 minis prepped for my revised dungeon crawl but none of them are painted. I canceled my games and my classes for the convention over Labor Day. With everything going on there was no way for me to be ready enough to give value to the people who signed up. So I'll bow out this time and try to get things going for the convention in February.
I feel bad about canceling my painting classes because the only other person teaching a number of classes also had to bow out for work. There's a slim chance he can make it but he's not counting on it. A few people have offered to pick up his classes. The coordinator is thinking of not having any painting classes this year because of the two of us canceling.
Why did I back out of everything? Honestly, no time or inclination to prep. I did build the additional wall sections for the dungeon but haven't painted them. I prepped almost all the minis I could (missing bits and pieces for 8 of them) and they're ready to be painted. I just have zero motivation to sit down and paint them.
I haven't worked up the new rules, the new tables, the new treasures or anything else for the dungeon crawl. I certainly haven't play tested it.
I'm pushing the reason off on work since that really is taking up more of my time but I think there's more to it than that. I don't plan on going to the con at all, honestly. I have no reason to go. When the only thing I do is run games and teach classes then go home it's hard to look forward to it.
Otherwise not too much happening in the hobby world for me. Our local game store was seized by the state for back taxes so we have no home. A group of people is trying to get the capital and business plan together to open a new store with a new name in the same location. But that's not certain and there's no dates. What little interaction I had with the game club is going to be much more difficult as they move around the game stores for different days.
My gaming group hasn't met since April. I don't miss it all that much. I didn't get the time to try and fit it plus this was a group that has been playing together for about a decade. Very difficult to mesh. That and trying to get used to how the GM runs his game made things hard for me to relax and enjoy.
The 40K hasn't interested me at all. I think the pressure of wanting to get the dungeon crawl minis done killed a lot of motivation to paint at all. They're off to the side so I don't need to see them. Except for the ones still in the process of being assembled or waiting for parts. I cleaned off the paint table pretty well. That started when my friend came over to paint one evening and I needed to make room. Then as part of a "tidy up" mood I worked on cleaning off more and generally cleaning up the hobby area. It's pretty bare now.
I still have 15mm to paint but the problem with basing the ones I did have painted has discouraged me. I know I'll figure out how to make it better but expecting 6 nicely finished stands of minis and getting what I got didn't help the entire situation.
So yes. Things are going on but there's not a lot of progress to show. Maybe I'll post some pics when I have something to show.
Monday, January 10, 2011
Quick update on progress
No pics tonight. Sorry. But there will be soon. Promise!
I've got the last of the small rooms assembled and the edges painted, waiting for the detail painting. One more small room has the gold lining done on the medieval floor pattern. I'll probably be painting that one but a friend of mine has some vague interest in it. He does have interest in painting the last 2 door frames. Especially since I'm out of ideas. If he can't get them done I'll figure something out.
I'm also building 1 x 2 corridor pieces. I actually need those for dead ends (odd by even, remember?) and I can use them with corridor sections to build extra rooms if necessary. I can put them together to make more corridors. And they fill in a space in the floor tile layers in the boxes. All kinds of uses!
I think there's one more set of 1 x 2 pieces after these are done unless I get ambitious and use up all the cast floor tiles. Why not? I can always cast more.
I also pulled out the filler pieces I need to complete the gaps between the room and corridor walls. I may need a few more than I seem to have but there's another mold that makes them so I need to pillage that box for the remaining few. Those just need to be painted.
I'm painting prepped minis now. Tonight I finished up 8 skellies and got the base coat on their bases. Tomorrow I can dry brush them up, touch up the base edge, number them, and then they're ready for varnish. Skellies are easy. I couldn't resist some fancy stuff (comparatively) but it didn't take long and I like it. I think I'll add a little flock as moss to the bases to break up the grey.
I also got started on the drow but just wasn't in the mood to work on them so at least the skin base coats are on. Once I get involved they should go pretty quickly. I see a little freehand practice on cloaks but I need it anyway.
I have 2 minis about 2/3 done and need to finish those off. The whole list of what I need is sitting in a file somewhere so I'll need to get it out and start checking things off. And get the player characters painted up. Those get more paint love than the monsters.
Oh yeah. The spiders. I just need to figure out the freehand on the second one and they're done. Attaching them to bases takes a little different work because they need epoxy but it's nothing I haven't done before.
Saturday, January 8, 2011
More floors
Yes, I'm getting to the point where all there is left to do for the dungeon is the room floors. All of the dungeon components have been painted, varnished and carefully put into their storage boxes. I know I'll be pulling them out to do a display layout but first I need to make sure they fit in the first place.
I added gold to some of the sections on this floor. Now if you look at it you'll also see a circular pattern that wasn't obvious before.

Then I got the chain floor done. This room is a bit of an odd shape and I didn't make any more like it. Technically it fits the requirements of the game. I just didn't like it.

The white is still a little uneven to me but from gaming distance it should be fine.
I added gold to some of the sections on this floor. Now if you look at it you'll also see a circular pattern that wasn't obvious before.
Then I got the chain floor done. This room is a bit of an odd shape and I didn't make any more like it. Technically it fits the requirements of the game. I just didn't like it.
The white is still a little uneven to me but from gaming distance it should be fine.
Thursday, January 6, 2011
Another fancy floor
This one is from the A&K Medieval Floor mold and has been a bit of a challenge to build much less paint.

It's kind of difficult to see that there's silver sections that I used to try to define more of the design. I may have to paint them gold or some other color to make it stand out.
It's kind of difficult to see that there's silver sections that I used to try to define more of the design. I may have to paint them gold or some other color to make it stand out.
Wednesday, January 5, 2011
Dungeon Bash Small Room and Vindication
Turns out I was right about the room scale, I just have to have them oriented a particular way for it to work. Not a problem and now I know. The side with the even number of tiles needs to be along the edge with the corridor/door. Again, I still need to put together a larger layout to see if that's going to cause issues with assembly but I doubt it.

Yes, I still need the small pieces to fit the gaps where the walls meet. They're on the list to be painted.
Yes, I still need the small pieces to fit the gaps where the walls meet. They're on the list to be painted.
Monday, January 3, 2011
A very quick setup
I couldn't resist showing off this painted room since I had to move it up out of harm's way anyway. I couldn't get the corner and wall segments to work and that's frustrating since I thought I did the math right. I'm going to work with the layouts more since that might be part of the problem. Otherwise I figure out how to correct (make 1 inch wall sections?), add more cracked floor tiles to make it work, or just work around it. I have half the rooms to make yet so no matter what the fix is those will be "right".

I can never resist a PC level shot. Enter if you dare ...

Yes I see the gap between the wall and the door frame. Again, quick layout. And if people are looking at that kind of detail then I'm not running the game correctly.
I can never resist a PC level shot. Enter if you dare ...
Yes I see the gap between the wall and the door frame. Again, quick layout. And if people are looking at that kind of detail then I'm not running the game correctly.
Subscribe to:
Posts (Atom)