Honestly some days I feel like I'm too stupid to 3D print.
I'm currently printing some upgrade parts for my printer. One of my printers. If I like it I'll print them for the other printer. They'll also work on the upgrades (hopefully) so they're not a waste of time and filament.
Since these parts are near where the molten plastic comes out they need to be a type that withstands high temperatures. You really should use one that's got a higher melting point than what you print with most of the time. That's common sense. People try to fudge it and pretty much always end up with sagging parts. That's not good.
So I pulled out the barely used roll of this stuff and started.
A quick run of the numbers. Skip this if numbers aren't your thing. Even worse they're in metric but I'll be nice and put the conversions in here too. 3D printers are pretty much all metric which is just fine for most of the world.
PLA - My main go-to plastic. Nozzle temp 220C (430F), bed temp 60C (140F).
PET-G - More flexible than PLA and handles higher temps better. Nozzle temp 240C (465F), bed temp 80C (175F).
ABS - The common high-temp plastic. Nozzle temp 255C (490F), bed temp 100C (212F).
The piece that wraps around the nozzle and blows air on the parts to cool them has to be printed out of at least ABS if not one with a higher nozzle temperature. Looking at the numbers you can see why. ABS has it's issues - it stinks, it doesn't like ANY kind of draft, and it prints hot. Literally you can boil water on the print bed when using this stuff. But sometimes it's what you use.
Fun fact. PLA will warp in a hot car. PET-G won't. Many is the person who has found out the hard way about leaving PLA pieces in their cars.
Anyway.
There's a glitch in the standard profile for ABS that ups the bed temperature to 110C after the first layer. It's not a glitch so much as a way to try keep the darn stuff from warping. However for some reason as soon as my printer bed goes over 100C it gets cranky the safety measures say it's too hot and shuts down the print. Sigh. And those are the temps that are in the vendor provided profiles.
It's common for bed temperatures to change after the first layer. Typically they drop by 5C but in this case it went up. Oh well.
I updated the profiles not to bump the bed temperature and went on my merry printing way. Except that it turns out I didn't redo all my files that I had created using the old profile.
This morning I was printing a small piece to check that it was getting smooshed onto the print bed enough without getting too smooshed. Fractions of millimeters count here. If it's too smooshed it leaves a ridge called an elephant's foot. Not only does it look bad it has an impact when you're doing things like printing parts for your printer. If it's not smooshed enough your bottom layers can look bad and the print can come loose from the print bed. So you dial that one in.
I forgot to redo that test piece with the change to the bed temperature. Bzzt. Print shuts down.
Grumble, grumble, mutter, mutter. Redo the part and copy it to the print server. Fine.
From what did get printed I decided what was in place would work. I knew this piece was done right since I did it this morning. What the heck. I have lots of this stuff and if they have a ridge I can fix it and print another set, right?
What I did was choose something with a very similar name but created for PLA. Obviously it isn't going to print well at all if you're using the wrong temperatures. Sigh. Luckily I caught it early since I was watching to make sure the temperature didn't bump up and wondered why the bed temperature was so low. Then I looked at the file name - they have the type of plastic in them.
Sigh.
Cleaned it up. Decided to print the test piece since I was starting over. Very slight elephant's foot so I'll be playing with that to get it better.
It will all work out but so many mistakes right at the beginning of my day makes me tired. You can only adjust the first layer height while it's printing the first layer (of course) so that's time sensitive and easy to miss on a small piece. But it's fine if you catch it at the right time.
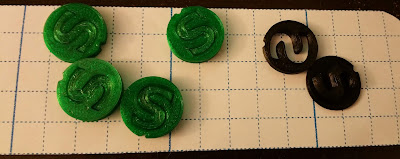
These are my test pieces. They're meant to make sure that you're extruding the right amount of plastic. If they fit together nicely then you're fine. If they're loose you're not extruding enough. If they don't fit you're extruding too much. There's a modifier in the software that makes the files where you can adjust that. The green ones are PET-G and the color of all the parts for my upgraded printer. The black ones are ABS and the color for the fan shroud.
And another piece of eye candy is a good first layer. That's actually called "First Layer Pron" but spelled correctly (I changed it here to make sure any filters wouldn't catch it and consider this an adult content blog). Seeing a good first layer is always a wonderful thing, if you're a 3D printer.


