Really? You think you're ready to jump into the wild and wonderful world of 3D printing?
This is where the GM asks "Are you sure?"
Because here's what I've been dealing with on one of my printers. They're the same brand, same version, same pretty much everything. I say 'pretty much' because there are some differences.
A little while ago I had one of the print head fans die on me. No big deal. I had a replacement on hand. Take the old one off, unwrap the cable harness, swap the cables, put the new fan on. It's not that difficult. However...
The fan model I got was the one recommended at the time. If you're interested it's a Noctua. And it even comes with a handy adapter pack! Of course none of the adapters fit my printer. No matter. I have a soldering iron. Clip, solder, heatshrink tube. I'm ready to go!
Fan goes on fine and tests fine.
Then I start getting clogging on various filaments at various times. The same filaments work fine on the other printer. I was annoyed and frustrated. There was a clog serious enough I had to take the print head apart and drill out some of the filament. More on that spool later.
I put it all back together and it's still being inconsistent. Which means I'm down a printer.
I wonder what the previous owner did to this and if the heat transfer isn't quite right. Clogging can be caused by that. So I take the hot end apart AGAIN and put fresh thermal paste on one piece, carefully putting it all back together.
Then it hits me. There had been posts about the Noctua fans but I couldn't remember them. A little searching in one of the Facebook groups and asking the guys in the moderator chat tells me that the Noctua fan doesn't push enough air, causing things like clogs. Sigh.
Luckily I had bought new fans for the pending upgrade, including one as a spare. This isn't quite as involved since it's a fan swap (again). Off with the Noctua, on with the Sunon. At least this one is a pretty black instead of the weird tan and flesh color of the other one.
Since I had the print head disassembled I have to calibrate it again. The full deal, not just the minor one. This includes setting the nozzle height from the base bed manually (you literally use a flashlight to see the space between the nozzle and the print bed) then adjusting the induction probe to a certain height. Only then can you run the software to calibrate. Three tries later (changing NOTHING, btw) I get it to pass calibration. But I'm not done yet..
It still needs to be fine tuned to the print bed. In our world that's called a Live Z since you can adjust the height of the first layer while it's printing. Live. On the Z axis. Pretty cool, right?
Ok. Fine. I have a little file to do this. I load up the printer and the new fan is spinning away. Yay. But the print is coming out in these little dots. Sigh. Nozzle clog. Unload the filament and get out the cleaning filament. That's just nylon, really, but it prints hotter so up the temperature and load the cleaning filament.
This is the point where it would hesitate then start extruding a nice thick line of cleaning filament. Nope. Not this time. There's more of a clog. So a cold pull it is. Set the temperature to where the filament will be solid then wait. Once it's cooled down pull the filament back out, hopefully capturing any stray bits that were hanging around.
Why didn't any of this show up when I had it in pieces? I didn't do a cold pull because I honestly didn't think I had a clog of this nature. They're not that common. The new fan doesn't do squat when there's a solid piece of something physically blocking the 0.40mm opening of the nozzle.
The first cold pull showed a chunk of the last filament I tried to print was hanging around in there. So back up goes the temperature and another cleaning filament load. Nope. Still clogged. Time for a second cold pull so down goes the temperature. The cleaning filament isn't showing anything obvious but it's also not the pretty point I want showing a clear nozzle.
Back up goes the temperature for another cold pull. This time I'll manually feed the cleaning filament until I can see it coming out the nozzle then drop the temperature to pull it back out. A lot of this time is spent waiting for the nozzle temperature to get to where I want it.
While I'm waiting I'll remind you of the temperatures. The printers are in metric so the temperatures are in Celsius. My normal printing temperature is 220C (428F). The cleaning filament works best at 265C (509F). The 'drop' is to 180C (365F). It's easy to forget just how hot these run until you do the math or do something stupid like grab plastic that came right out of the nozzle.
Third run with the cleaning filament. Back up goes the temperature. I'm going to let the print head feed it this time and see what happens. And it's still clogged. Back down goes the temperature. This one also shows as inconclusive. I'm not seeing anything in there but I'm also not seeing the right shape to the end of the filament.
I'm done for the night. I can only do so much before it gets too frustrating to continue. Other people may have more patience but after a long day at work and then putting the printer back together I can only do so much troubleshooting.
Tomorrow I'll work more on figuring out what's going on with the filament not feeding and make a new post about what's going on.
The other printer is chugging along nicely, printing Star Wars: Legion terrain for someone.
What does this have to do with a desire to buy a 3D printer? I'm detailing this to give you an idea of some of the things you WILL have to do at some point. These things are great, until you have to break out the tools to figure out what's not working right. If you're not a patient person and you don't like to tinker with things then you're not going to enjoy your printer.

Thursday, July 25, 2019

Sunday, July 14, 2019
Nothing Interesting, Sadly - But with Pictures!
On the 3D printing front I'm currently churning through prints for other people. It's nice to have things to do and I enjoy printing for them. But it takes the printers out of commission for my own stuff. Of course that's when I find things I really want to print for myself but forget again when the printers are open.
Life.
I just finished a bunch of Gaslands terrain for someone. And car parts. That's when I found out that Inland's 'consistent color' isn't really that great. The grey went from light grey to medium/dark. Luckily it didn't matter in the print I was doing but I'm going to have to take both filament cats to the store and find out what is the grey going forward. Or stock up on both colors. I'm not sure yet.

These are both just called 'Grey' on the label. I think they're different colors. And yes. That's a grey hair of mine on the darker one. It got stuck under the label I put on each cat. It has been removed from the cat with extreme prejudice. It was nicely appropriate to the topic so I'll give myself points for it.
Another thing I'm printing is a lot of Star Wars: Legions terrain. I got done with Tatoine and now I'm on to Imperial. I hope to get some pictures once he's painted them because they look better that way. But it's been some long prints and I'm just starting up the Imperial. Luckily I have a spool of grey from a company that's gone out of business so I can use it up on this stuff. I should use up most of the spool if not all of it. The dark grey above matches close enough that it shouldn't matter if I have to swap it in.
I lied. Here's some of the Tatoine stuff. The light brown seemed appropriate to the setting and I printed them in thicker layers so they'll have a nice texture when he paints them.


I have a lot of printing left to go for another friend who bought into a Printable Scenery Kickstarter for elven terrain with the intention of me printing them. Literally this has been hours of printing. Hundreds of hours and spools of filament. He doesn't care what color they are so I've been using up more of those discontinued colors and am quite happy about it.
I don't think I ever shared any of those prints so here's a couple of them. If I have shared them you get to see them again.


Just to give you an idea that large one (it's a library) took 156 hours to print the four pieces. And those minis are on one inch bases. So there's a lot of time invested in his printing and he keeps sending more files my way. I hope some day to be caught up so I can mail it off to him.
Other than those there's been a couple of small print jobs for friends and those are nice to have done. I've also printed up some Tardis boxes that I'll sell as dice containers (yes, I checked the license and I can sell them) which used up all but some of the discontinued WhoBlue color. I need the rest of it for a game organizer container. Whatever is left is going to be Tardis LED earrings. It was meant for Tardis stuff, might as well use it that way.
I think that covers the 3D printing.
I haven't made much (any) progress in clearing off my workspace. I know I need to do it and I keep meaning to do it. But life happens then suddenly it's close to when I need to start winding down to go to sleep which means no working on organizing. It's maddening and worse because I'm doing it to myself.
Add onto that going to two conventions in the next month and my time is limited. I'll go to one, have a couple of weeks, then go to the other. The second one has planned very poorly for scheduling their convention. They used to have it in May, then October. Both weren't bad. Then they switched to Labor Day weekend. Which is bad. The timing is actually bad because of the huge convention just a couple of weeks ahead of it, being the same weekend as a huge convention, and over a holiday weekend. But I don't work there so I just show up and do my thing.
Last thing! I have a hoard of GM accessories. A literal hoard. I love those things and I'm a sucker for them. The item generators folder on my hard drive is packed full of files and I have other things as well. Just recently I got some dice (yay dice!) for when you need to add some detail to rooms on the fly. Of course I like to add more detail so I got three of each set.


I need to find a better way to store them. The little boxes are great until you pick one up wrong and have dice all over the floor. I'll probably end up designing and printing something to hold them. Or just toss them all in a random dice bag. It's not like I don't have plenty of those sitting around.
Each color is a different theme. I'd have to look up what they are and I will be making a reference card for myself since I know there's no way I'm going to remember it. But aren't they fun??
Life.
I just finished a bunch of Gaslands terrain for someone. And car parts. That's when I found out that Inland's 'consistent color' isn't really that great. The grey went from light grey to medium/dark. Luckily it didn't matter in the print I was doing but I'm going to have to take both filament cats to the store and find out what is the grey going forward. Or stock up on both colors. I'm not sure yet.

These are both just called 'Grey' on the label. I think they're different colors. And yes. That's a grey hair of mine on the darker one. It got stuck under the label I put on each cat. It has been removed from the cat with extreme prejudice. It was nicely appropriate to the topic so I'll give myself points for it.
Another thing I'm printing is a lot of Star Wars: Legions terrain. I got done with Tatoine and now I'm on to Imperial. I hope to get some pictures once he's painted them because they look better that way. But it's been some long prints and I'm just starting up the Imperial. Luckily I have a spool of grey from a company that's gone out of business so I can use it up on this stuff. I should use up most of the spool if not all of it. The dark grey above matches close enough that it shouldn't matter if I have to swap it in.
I lied. Here's some of the Tatoine stuff. The light brown seemed appropriate to the setting and I printed them in thicker layers so they'll have a nice texture when he paints them.


I have a lot of printing left to go for another friend who bought into a Printable Scenery Kickstarter for elven terrain with the intention of me printing them. Literally this has been hours of printing. Hundreds of hours and spools of filament. He doesn't care what color they are so I've been using up more of those discontinued colors and am quite happy about it.
I don't think I ever shared any of those prints so here's a couple of them. If I have shared them you get to see them again.


Just to give you an idea that large one (it's a library) took 156 hours to print the four pieces. And those minis are on one inch bases. So there's a lot of time invested in his printing and he keeps sending more files my way. I hope some day to be caught up so I can mail it off to him.
Other than those there's been a couple of small print jobs for friends and those are nice to have done. I've also printed up some Tardis boxes that I'll sell as dice containers (yes, I checked the license and I can sell them) which used up all but some of the discontinued WhoBlue color. I need the rest of it for a game organizer container. Whatever is left is going to be Tardis LED earrings. It was meant for Tardis stuff, might as well use it that way.
I think that covers the 3D printing.
I haven't made much (any) progress in clearing off my workspace. I know I need to do it and I keep meaning to do it. But life happens then suddenly it's close to when I need to start winding down to go to sleep which means no working on organizing. It's maddening and worse because I'm doing it to myself.
Add onto that going to two conventions in the next month and my time is limited. I'll go to one, have a couple of weeks, then go to the other. The second one has planned very poorly for scheduling their convention. They used to have it in May, then October. Both weren't bad. Then they switched to Labor Day weekend. Which is bad. The timing is actually bad because of the huge convention just a couple of weeks ahead of it, being the same weekend as a huge convention, and over a holiday weekend. But I don't work there so I just show up and do my thing.
Last thing! I have a hoard of GM accessories. A literal hoard. I love those things and I'm a sucker for them. The item generators folder on my hard drive is packed full of files and I have other things as well. Just recently I got some dice (yay dice!) for when you need to add some detail to rooms on the fly. Of course I like to add more detail so I got three of each set.


I need to find a better way to store them. The little boxes are great until you pick one up wrong and have dice all over the floor. I'll probably end up designing and printing something to hold them. Or just toss them all in a random dice bag. It's not like I don't have plenty of those sitting around.
Each color is a different theme. I'd have to look up what they are and I will be making a reference card for myself since I know there's no way I'm going to remember it. But aren't they fun??
Sunday, June 16, 2019
Some Drawing
I will be the first one in a long line of people who say that my drawing skills are somewhat less than optimal. 2D has never been something I do very well. That doesn't stop me from trying. If anything working on a skill that is difficult makes the successes that much more important to me.
I'm signed up for a half day calligraphy workshop next month. That has little to nothing to do with the rest of this blog entry but it does tie in. My fascination with medieval manuscripts has been kicked into gear again by some of the accounts I follow on Twitter. Since those manuscripts are illuminated and decorated that means drawing.
Add in the interest in drawing RPG maps and it's inevitable that I would be pulling out the pencils and fighting my lack of innate talent.
I was cruising YouTube when I found a set of instructional videos on knotwork where it finally 'clicked' for me. I'd tried drawing that off and on for years but never really got the hang of it. I can grasp the theory behind it and even some of the design structure. I just couldn't (or wouldn't) get them on paper.
If you're interested this is the first of the series of videos that made sense to me. I started with his method of drawing grids but quickly moved to graph paper to cut out a level of complexity.
Here's some of the things I've done. There's failures in there, especially as I work with break lines. I tend to mess those up about twenty percent of the time. But it's better than it was!


I'm signed up for a half day calligraphy workshop next month. That has little to nothing to do with the rest of this blog entry but it does tie in. My fascination with medieval manuscripts has been kicked into gear again by some of the accounts I follow on Twitter. Since those manuscripts are illuminated and decorated that means drawing.
Add in the interest in drawing RPG maps and it's inevitable that I would be pulling out the pencils and fighting my lack of innate talent.
I was cruising YouTube when I found a set of instructional videos on knotwork where it finally 'clicked' for me. I'd tried drawing that off and on for years but never really got the hang of it. I can grasp the theory behind it and even some of the design structure. I just couldn't (or wouldn't) get them on paper.
Here's some of the things I've done. There's failures in there, especially as I work with break lines. I tend to mess those up about twenty percent of the time. But it's better than it was!


You can see some of the progression as I keep trying different things. You can also see where I stopped filling in the negative space.
Let's face it. These are easy designs. And I haven't worked towards the thinner lines yet or adding color. I'm working on the core concepts and until I'm happy with that I'm going to stay right where I am.
Break lines take more work both in placement and remembering not to get too close and/or cross them. I'm still working on that. I'm staying with graph paper until then.
After I'm comfortable with my ability to do slightly more complex designs then I'll probably move down to thinner lines. These are nice but not really practical when used in layouts. They're too chunky. Chunky helps with learning so I'm not complaining.
For those of you who do this regularly or can just doodle them out then I salute you. For me this is a real work of effort and concentration. I've got more pages I've been filling up with various sizes, shapes, and patterns as I practice. On every page there's a couple of failures and I refer back to them to find out what did wrong.
I know I can scan these and clean up things like lines I accidentally crossed. But that's not the point. I want to not cross those lines in the first place. The way to do that is understand the mistake.
Not too long ago the mistakes would have made me frustrated and upset. They would have given me pause about continuing. I've mellowed out about that in the last few years and can accept mistakes for what they are. Mistakes and learning opportunities.
The work I want to do in the future will only hit the scanner once it's complete. Nothing will be done to clean it up or change it. I like the little inconsistencies of hand drawn work. Looking at historical documents they're not perfect. That's part of their appeal.
In my opinion we're spoiled by perfection. Computers are a part of that. But somehow that looks 'dead' to me. The hand drawn works with all their little oddities make for a piece with life. It's more work and mistakes mean fixing or even starting over. Or changing the design. Hand drawn is certainly more demanding. That suits my personality very well.
I do plan on using these designs for freehand on miniatures and on terrain painting. The techniques will be adapted for those, of course. But the very first step is knowing I can be sitting in a boring meeting and do a fabulous corner doodle while someone is reading off the PowerPoint slides that were emailed to us days earlier. It's a personal thing and a way to keep myself amused.
As I said. Things that are difficult for me give me more satisfaction when I can do them. If it's something that is easy then the achievements are expected. These achievements are work.
Saturday, May 11, 2019
How to Start Painting Minis
It's been ages since I posted anything on painting minis. This post happened because one of the Facebook groups I'm in had someone brand new asking how to get started. They were overwhelmed with the number of YouTube videos and was looking for help with the basics.
Note - they had already bought a paint set that comes with paints, washes, and brushes. I don't advertise here so I'm not giving the brand name but it's very popular for that exact reason - their sets come with what's needed to paint armies. They do also work for individual minis so don't be turned off by the name.
Years ago I used to teach beginning painting at a local convention. We had two hour class slots. My intention was that everyone who took my class would take home a finished mini. Maybe not varnished but at least fully painted and ready for the table. That's quite a goal to achieve with people who have never painted a mini before.
Everyone in my class - regardless of age - left with a mini they had painted and were proud to show off. It literally brought a tear to my eye when they were all excited about what they had done and doing more of it in the future. I had accomplished my goal!
A little bit of snark. One other person really wanted to teach beginning painting as well. He got one of the three classes. I had one of the people who took it at a game I ran later. They got about halfway through their minis and would have to go back to finish them. It's obvious he and I took different approaches in our teaching.
If I don't already have a post about the higher level painters and their issues with teaching low level painters I will be writing one. It's not a slam on those painters at all. It's about being able to 'reach down' to the level of the students and not do things that are second nature once you reach levels of skill.
Anyway. To continue.
My class included a handout going over everything we did, some basic color theory, and additional reading at the end that went into more detail about things I knew I couldn't to justice to in two hours while trying to teach. I had pre-painted my minis to each step so I had an example but wasn't painting and teaching at the same time. I wrote the handout as I progressed through the steps.
The resulting mini is just fine for tabletop. There's no fancy eyes or attempts to layer colors. There's no fine detail work. It's a nice mini and has the people learning the very foundations of painting - color choice, brushwork, shadows and highlights, etc. The extra material goes a bit more into choosing colors, painting the five difficult colors (red, black, white, yellow, and purple), choosing and caring for brushes, and basing. Not bad in seven pages, I admit.
Here's a link to that document. There's no pictures since it was designed to be used in combination with in-person teaching and without knowing what minis I would get for my classes. At the time I was teaching I could request minis and I chose carefully for ones that weren't cluttered up with junk. Without knowing what people are trying to paint it's safer to leave those out.
The link!
Beginner Mini Painting
I've revised it slightly to remove references to the local paint group and add YouTube as a resource. I also cleaned up some typos and generally revised it to be more generic. It had been a while since I looked at it and I hadn't made it public before.
So please. Enjoy the reference if you're looking to get into mini painting or know people who want to do it but think they don't have the skill. I had kids under age ten finish their minis as well as their parents. It can be done. It's not anything to use in a painting competition. But they look darn nice on the gaming table.
Note - they had already bought a paint set that comes with paints, washes, and brushes. I don't advertise here so I'm not giving the brand name but it's very popular for that exact reason - their sets come with what's needed to paint armies. They do also work for individual minis so don't be turned off by the name.
Years ago I used to teach beginning painting at a local convention. We had two hour class slots. My intention was that everyone who took my class would take home a finished mini. Maybe not varnished but at least fully painted and ready for the table. That's quite a goal to achieve with people who have never painted a mini before.
Everyone in my class - regardless of age - left with a mini they had painted and were proud to show off. It literally brought a tear to my eye when they were all excited about what they had done and doing more of it in the future. I had accomplished my goal!
A little bit of snark. One other person really wanted to teach beginning painting as well. He got one of the three classes. I had one of the people who took it at a game I ran later. They got about halfway through their minis and would have to go back to finish them. It's obvious he and I took different approaches in our teaching.
If I don't already have a post about the higher level painters and their issues with teaching low level painters I will be writing one. It's not a slam on those painters at all. It's about being able to 'reach down' to the level of the students and not do things that are second nature once you reach levels of skill.
Anyway. To continue.
My class included a handout going over everything we did, some basic color theory, and additional reading at the end that went into more detail about things I knew I couldn't to justice to in two hours while trying to teach. I had pre-painted my minis to each step so I had an example but wasn't painting and teaching at the same time. I wrote the handout as I progressed through the steps.
The resulting mini is just fine for tabletop. There's no fancy eyes or attempts to layer colors. There's no fine detail work. It's a nice mini and has the people learning the very foundations of painting - color choice, brushwork, shadows and highlights, etc. The extra material goes a bit more into choosing colors, painting the five difficult colors (red, black, white, yellow, and purple), choosing and caring for brushes, and basing. Not bad in seven pages, I admit.
Here's a link to that document. There's no pictures since it was designed to be used in combination with in-person teaching and without knowing what minis I would get for my classes. At the time I was teaching I could request minis and I chose carefully for ones that weren't cluttered up with junk. Without knowing what people are trying to paint it's safer to leave those out.
The link!
Beginner Mini Painting
I've revised it slightly to remove references to the local paint group and add YouTube as a resource. I also cleaned up some typos and generally revised it to be more generic. It had been a while since I looked at it and I hadn't made it public before.
So please. Enjoy the reference if you're looking to get into mini painting or know people who want to do it but think they don't have the skill. I had kids under age ten finish their minis as well as their parents. It can be done. It's not anything to use in a painting competition. But they look darn nice on the gaming table.
Sunday, May 5, 2019
A Very Productive Weekend
It wasn't as productive as I hoped but I'm very happy with what I got done.
First off - basing sand for miniatures. Long, long ago I bought a pound of something called 'decor sand' at a garden store. It was sand with a mixed grade of granules so there was some really nice variety in there. I used it on my minis to much success. But then I ran out. I couldn't find anything local and made a make-do mix of sand and talus.
When I went back to the Midwest for a friend's wedding a few years ago I went back to the store with the intention of bringing home several pounds of it. Sadly they no longer carried it.
I continued to limp along until I saw one of DM Scotty's videos where he recommends construction sand for that exact thing - far more irregular mix of sand for basing. I was happy!
Construction sand only comes in forty pound tubes. That's a lot of sand. I did get a broken one at a seventy percent discount and it sat in the trunk of my car for months. Mostly because I literally had no way to carry it to the apartment. It was very precariously bagged.
Finally this weekend I used the sifter I printed (I checked the manufacturer's description and found that the largest grit was far larger than I liked for minis and printed a sieve of appropriate size) and separated all the sand. I had to do it over two days because I ran out of storage containers and because it was getting dark on Saturday.


First off - basing sand for miniatures. Long, long ago I bought a pound of something called 'decor sand' at a garden store. It was sand with a mixed grade of granules so there was some really nice variety in there. I used it on my minis to much success. But then I ran out. I couldn't find anything local and made a make-do mix of sand and talus.
When I went back to the Midwest for a friend's wedding a few years ago I went back to the store with the intention of bringing home several pounds of it. Sadly they no longer carried it.
I continued to limp along until I saw one of DM Scotty's videos where he recommends construction sand for that exact thing - far more irregular mix of sand for basing. I was happy!
Construction sand only comes in forty pound tubes. That's a lot of sand. I did get a broken one at a seventy percent discount and it sat in the trunk of my car for months. Mostly because I literally had no way to carry it to the apartment. It was very precariously bagged.
Finally this weekend I used the sifter I printed (I checked the manufacturer's description and found that the largest grit was far larger than I liked for minis and printed a sieve of appropriate size) and separated all the sand. I had to do it over two days because I ran out of storage containers and because it was getting dark on Saturday.

On the left, basing sand. On the right, rocks. Underneath, sixteen inch paving stones to go under the upgraded 3D printers and a broken cut-off wheel from the next listed project.

Yeah. I'm going to have to find a home for a lot of this sand. Because I have way too much of it even with the number of minis I need to paint. I'm still debating about that. There were a surprisingly small amount of rocks in the mix which makes me happy. It still leaves a lot of sand.
Next up was shelf support. The shelves I put in the craft/sewing/office room didn't have enough dividers. I used an extra set to add a level above what the intended size was so I really can't blame them. The top shelves were always intended to hold army transports both empty and full so that was going to need to be fixed.
I bought a four inch diameter pipe from Home Depot and needed to cut it down to the correct size. That pipe sat in the room for months. The shelves sagged more and more. This weekend it was remedied. The pipe was cut (combination of Dremel and hand saw) and the cut edge smoothed and chamfered. With only moderate profanity it was wedged into place and the shelving unit is now complete.
Before:

After:

Scary sag gone. I made sure the size would be enough to span all of the shelves and support them equally. No more worries about the top layer collapsing and the shelves breaking, much less what would happen to what was on them.
Next up was 3D printer related. One of the fans died and the replacement fan I had didn't have the correct connector. Correct fan, not correct connector. The solution is to solder the new fan onto the old cable. It's a known solution and not something that bothers most people. You can buy fans from 3D printer stores with the correct connector in place but I got mine from Amazon. I'd been putting off the project because I just didn't want to do it. That and my soldering skills are somewhat rusty.
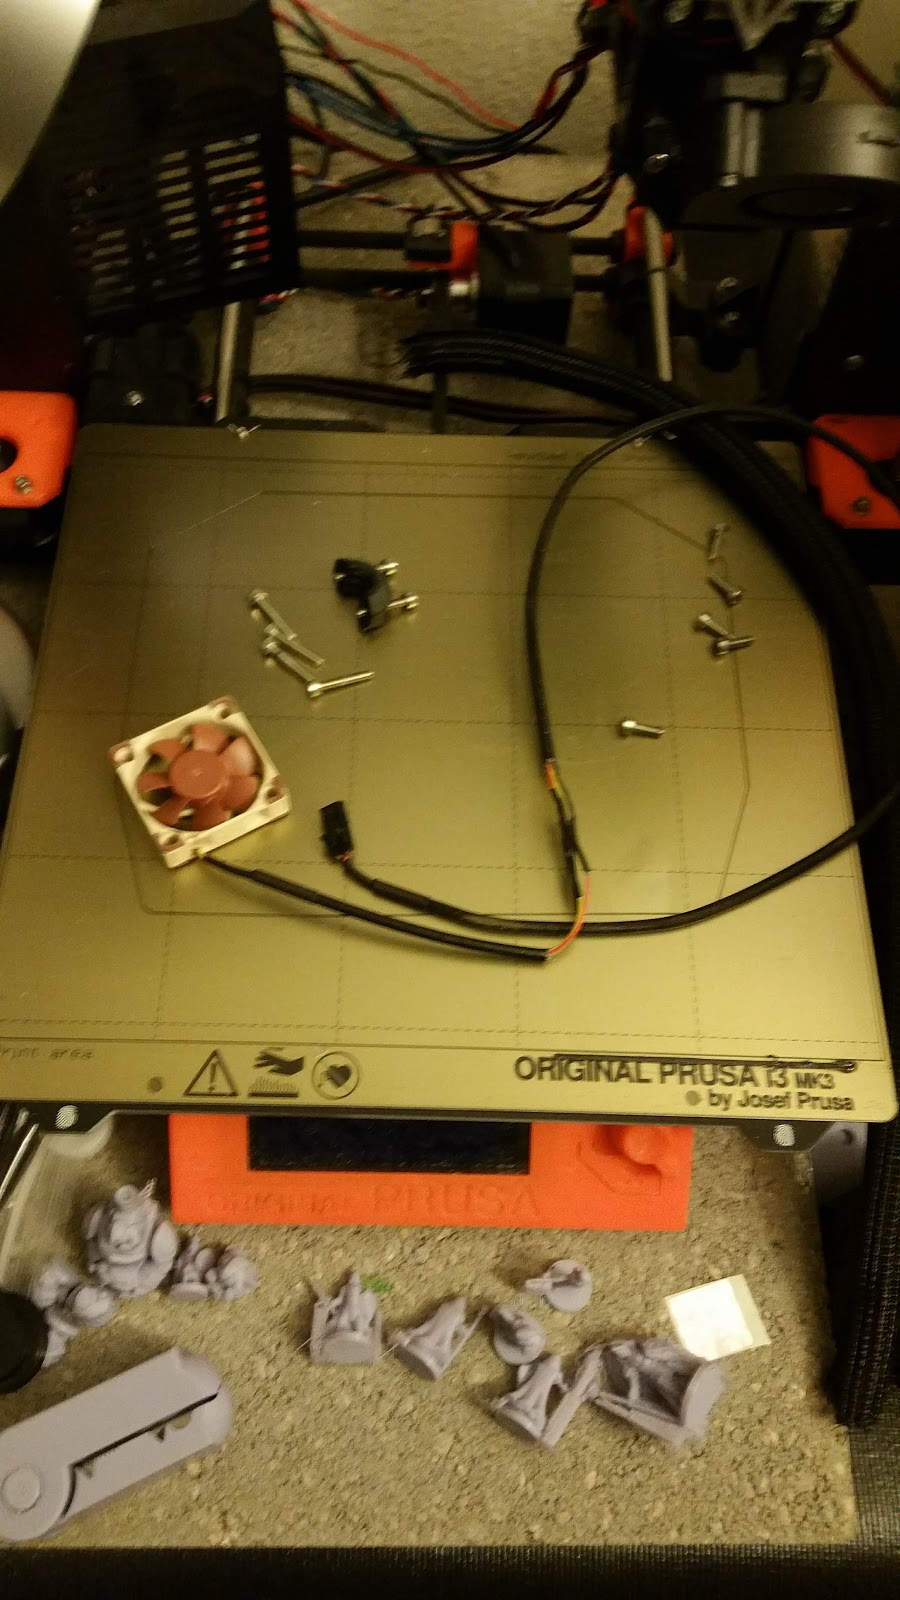
Solder and heat shrink tube later and I have the new fan ready to be put into the printer. This is the one thing I didn't get done that I had planned. I was going to reassemble the printer and yes, I could have done it instead of writing this very long blog post. But I know my state of mind and would rather not have tried to reassemble it tonight. I know my limits. I'll do it this week after work one day.
Those are various and sundry 18mm miniatures I've printed along with a very handy nipper for cutting filament at the right angle to load into the printer. I printed that too - except the razor blade inside. It's also darn good at nipping incautious fingers.
Last but not least was something for me to do while I had all the stuff out to cut the support pipe. A future as of yet not disclosed project needs a rubber squeegee. It needs a small rubber squeegee. Shopping for the correct kind of rubber squeegee (I like the word 'squeegee' it seems) had me asking if I was in the wrong line of work.
Ingenuity to the rescue.

This is 3 squeegees cut down from a dollar store bathroom shower squeegee. They will work exactly the same and cost significantly less. Even better is that I can replace them very quickly.
So that was my productive weekend. I also made a trip to the not-so-local but much friendlier game store to buy the new Chessex dice that were released last week. As I warned them I ended up not buying two of the styles because they weren't attractive enough for me. These dice have swirls of color and it's very subjective. I did get two sets of another style (one to leave as-is for the collection, one to repaint the numbers a more pleasing color) and two sets from the case. One set is trade/sale fodder, the other is a nicer version of one I already have.
It might not sound like much but I did more this weekend than I've done in a very long time. I even spent a little time on the stationary bike in the apartment complex fitness room to try to make my knee feel better after standing at the trunk of my car sifting sand for far too long. It worked, along with the heating pad after.
I'm very proud of what I accomplished and the tasks I finished. I didn't just do things - I finished them. All the sand is sifted and my car trunk has been emptied. The support piece has been properly cut and finished then wedged into the shelves. Actually finishing tasks is something I'm not great at so doing so many of them in one block of time is something I'm going to put in the win column.
And during all that I had an idea for the blog to make more content that wasn't 3D printer related. I'll have to polish up the idea and see how it flies. Stay tuned. Better yet, follow.
Saturday, April 27, 2019
Organized Memories
I've got a lot of Hirst Arts molds. I've had them for quite a while. Since making the modular dungeon back in 2010 I haven't done much of anything with them. I'm in the process of cleaning and organizing the hobby stuff - a never-ending process by the way - I decided to finally put them away properly.

These are photo storage containers from Michaels but work excellently for storing molds. Most molds. Some are a bit tight in there but not enough to worry me. They have squish points. Luckily I had exactly the right number of containers for my molds. I didn't count them first. Typical of me, I know.
It took me some time since I wanted to do it once, do it right. That meant pulling up my old page which had all my molds so I knew which ones were there and then correlating them back to the Hirst Arts store to get their names. My page only had their numbers since that's what is on the images I took.
But first they needed to have the excess plaster scraped off (I probably should have washed them thoroughly but they're lucky they got this much attention) and then powder them. The powder is just one of those extra steps that is more of a precaution than a necessity. It's on the site to do it, I was going to do it.
Then it was a matter of going out on the patio and working slowly through each mold. Finding the next numeric one, cleaning it off, dusting it, making the label, putting it away. Mold by mold.
To make it more interesting I have a number of molds that are no longer in production. I do have a printout of them so those were easy enough to sort out. I also have some third party molds that I pretty much guessed the names at.
Two of my molds are on loan. I know who and when. I left open spots for them where they'll go when they're returned.
And I seem to be missing one mold. I'll have a better look at where they were since it's a thinner one but if I can't find it I'll put out a message to the old group to see if anyone borrowed it and didn't return it. I'm not very fond of it but it was on my list so I might as well see about getting it back if I can.
For a bit of eye candy here's the modular dungeon set up for a convention game.


These are photo storage containers from Michaels but work excellently for storing molds. Most molds. Some are a bit tight in there but not enough to worry me. They have squish points. Luckily I had exactly the right number of containers for my molds. I didn't count them first. Typical of me, I know.
It took me some time since I wanted to do it once, do it right. That meant pulling up my old page which had all my molds so I knew which ones were there and then correlating them back to the Hirst Arts store to get their names. My page only had their numbers since that's what is on the images I took.
But first they needed to have the excess plaster scraped off (I probably should have washed them thoroughly but they're lucky they got this much attention) and then powder them. The powder is just one of those extra steps that is more of a precaution than a necessity. It's on the site to do it, I was going to do it.
Then it was a matter of going out on the patio and working slowly through each mold. Finding the next numeric one, cleaning it off, dusting it, making the label, putting it away. Mold by mold.
To make it more interesting I have a number of molds that are no longer in production. I do have a printout of them so those were easy enough to sort out. I also have some third party molds that I pretty much guessed the names at.
Two of my molds are on loan. I know who and when. I left open spots for them where they'll go when they're returned.
And I seem to be missing one mold. I'll have a better look at where they were since it's a thinner one but if I can't find it I'll put out a message to the old group to see if anyone borrowed it and didn't return it. I'm not very fond of it but it was on my list so I might as well see about getting it back if I can.
For a bit of eye candy here's the modular dungeon set up for a convention game.

Several of the fancy floors are A&K molds that aren't on the market any more. They were fun to paint if slightly too small to fit in with the Hirst ones properly. The rest of the fancy floors are painted by me to be fancy. Mostly.
Thursday, April 25, 2019
Some Days...
Honestly some days I feel like I'm too stupid to 3D print.
I'm currently printing some upgrade parts for my printer. One of my printers. If I like it I'll print them for the other printer. They'll also work on the upgrades (hopefully) so they're not a waste of time and filament.
Since these parts are near where the molten plastic comes out they need to be a type that withstands high temperatures. You really should use one that's got a higher melting point than what you print with most of the time. That's common sense. People try to fudge it and pretty much always end up with sagging parts. That's not good.
So I pulled out the barely used roll of this stuff and started.
A quick run of the numbers. Skip this if numbers aren't your thing. Even worse they're in metric but I'll be nice and put the conversions in here too. 3D printers are pretty much all metric which is just fine for most of the world.
PLA - My main go-to plastic. Nozzle temp 220C (430F), bed temp 60C (140F).
PET-G - More flexible than PLA and handles higher temps better. Nozzle temp 240C (465F), bed temp 80C (175F).
ABS - The common high-temp plastic. Nozzle temp 255C (490F), bed temp 100C (212F).
The piece that wraps around the nozzle and blows air on the parts to cool them has to be printed out of at least ABS if not one with a higher nozzle temperature. Looking at the numbers you can see why. ABS has it's issues - it stinks, it doesn't like ANY kind of draft, and it prints hot. Literally you can boil water on the print bed when using this stuff. But sometimes it's what you use.
Fun fact. PLA will warp in a hot car. PET-G won't. Many is the person who has found out the hard way about leaving PLA pieces in their cars.
Anyway.
There's a glitch in the standard profile for ABS that ups the bed temperature to 110C after the first layer. It's not a glitch so much as a way to try keep the darn stuff from warping. However for some reason as soon as my printer bed goes over 100C it gets cranky the safety measures say it's too hot and shuts down the print. Sigh. And those are the temps that are in the vendor provided profiles.
It's common for bed temperatures to change after the first layer. Typically they drop by 5C but in this case it went up. Oh well.
I updated the profiles not to bump the bed temperature and went on my merry printing way. Except that it turns out I didn't redo all my files that I had created using the old profile.
This morning I was printing a small piece to check that it was getting smooshed onto the print bed enough without getting too smooshed. Fractions of millimeters count here. If it's too smooshed it leaves a ridge called an elephant's foot. Not only does it look bad it has an impact when you're doing things like printing parts for your printer. If it's not smooshed enough your bottom layers can look bad and the print can come loose from the print bed. So you dial that one in.
I forgot to redo that test piece with the change to the bed temperature. Bzzt. Print shuts down.
Grumble, grumble, mutter, mutter. Redo the part and copy it to the print server. Fine.
From what did get printed I decided what was in place would work. I knew this piece was done right since I did it this morning. What the heck. I have lots of this stuff and if they have a ridge I can fix it and print another set, right?
What I did was choose something with a very similar name but created for PLA. Obviously it isn't going to print well at all if you're using the wrong temperatures. Sigh. Luckily I caught it early since I was watching to make sure the temperature didn't bump up and wondered why the bed temperature was so low. Then I looked at the file name - they have the type of plastic in them.
Sigh.
Cleaned it up. Decided to print the test piece since I was starting over. Very slight elephant's foot so I'll be playing with that to get it better.
It will all work out but so many mistakes right at the beginning of my day makes me tired. You can only adjust the first layer height while it's printing the first layer (of course) so that's time sensitive and easy to miss on a small piece. But it's fine if you catch it at the right time.
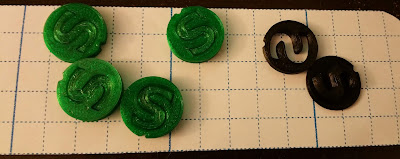
These are my test pieces. They're meant to make sure that you're extruding the right amount of plastic. If they fit together nicely then you're fine. If they're loose you're not extruding enough. If they don't fit you're extruding too much. There's a modifier in the software that makes the files where you can adjust that. The green ones are PET-G and the color of all the parts for my upgraded printer. The black ones are ABS and the color for the fan shroud.
And another piece of eye candy is a good first layer. That's actually called "First Layer Pron" but spelled correctly (I changed it here to make sure any filters wouldn't catch it and consider this an adult content blog). Seeing a good first layer is always a wonderful thing, if you're a 3D printer.

I'm currently printing some upgrade parts for my printer. One of my printers. If I like it I'll print them for the other printer. They'll also work on the upgrades (hopefully) so they're not a waste of time and filament.
Since these parts are near where the molten plastic comes out they need to be a type that withstands high temperatures. You really should use one that's got a higher melting point than what you print with most of the time. That's common sense. People try to fudge it and pretty much always end up with sagging parts. That's not good.
So I pulled out the barely used roll of this stuff and started.
A quick run of the numbers. Skip this if numbers aren't your thing. Even worse they're in metric but I'll be nice and put the conversions in here too. 3D printers are pretty much all metric which is just fine for most of the world.
PLA - My main go-to plastic. Nozzle temp 220C (430F), bed temp 60C (140F).
PET-G - More flexible than PLA and handles higher temps better. Nozzle temp 240C (465F), bed temp 80C (175F).
ABS - The common high-temp plastic. Nozzle temp 255C (490F), bed temp 100C (212F).
The piece that wraps around the nozzle and blows air on the parts to cool them has to be printed out of at least ABS if not one with a higher nozzle temperature. Looking at the numbers you can see why. ABS has it's issues - it stinks, it doesn't like ANY kind of draft, and it prints hot. Literally you can boil water on the print bed when using this stuff. But sometimes it's what you use.
Fun fact. PLA will warp in a hot car. PET-G won't. Many is the person who has found out the hard way about leaving PLA pieces in their cars.
Anyway.
There's a glitch in the standard profile for ABS that ups the bed temperature to 110C after the first layer. It's not a glitch so much as a way to try keep the darn stuff from warping. However for some reason as soon as my printer bed goes over 100C it gets cranky the safety measures say it's too hot and shuts down the print. Sigh. And those are the temps that are in the vendor provided profiles.
It's common for bed temperatures to change after the first layer. Typically they drop by 5C but in this case it went up. Oh well.
I updated the profiles not to bump the bed temperature and went on my merry printing way. Except that it turns out I didn't redo all my files that I had created using the old profile.
This morning I was printing a small piece to check that it was getting smooshed onto the print bed enough without getting too smooshed. Fractions of millimeters count here. If it's too smooshed it leaves a ridge called an elephant's foot. Not only does it look bad it has an impact when you're doing things like printing parts for your printer. If it's not smooshed enough your bottom layers can look bad and the print can come loose from the print bed. So you dial that one in.
I forgot to redo that test piece with the change to the bed temperature. Bzzt. Print shuts down.
Grumble, grumble, mutter, mutter. Redo the part and copy it to the print server. Fine.
From what did get printed I decided what was in place would work. I knew this piece was done right since I did it this morning. What the heck. I have lots of this stuff and if they have a ridge I can fix it and print another set, right?
What I did was choose something with a very similar name but created for PLA. Obviously it isn't going to print well at all if you're using the wrong temperatures. Sigh. Luckily I caught it early since I was watching to make sure the temperature didn't bump up and wondered why the bed temperature was so low. Then I looked at the file name - they have the type of plastic in them.
Sigh.
Cleaned it up. Decided to print the test piece since I was starting over. Very slight elephant's foot so I'll be playing with that to get it better.
It will all work out but so many mistakes right at the beginning of my day makes me tired. You can only adjust the first layer height while it's printing the first layer (of course) so that's time sensitive and easy to miss on a small piece. But it's fine if you catch it at the right time.
These are my test pieces. They're meant to make sure that you're extruding the right amount of plastic. If they fit together nicely then you're fine. If they're loose you're not extruding enough. If they don't fit you're extruding too much. There's a modifier in the software that makes the files where you can adjust that. The green ones are PET-G and the color of all the parts for my upgraded printer. The black ones are ABS and the color for the fan shroud.

And another piece of eye candy is a good first layer. That's actually called "First Layer Pron" but spelled correctly (I changed it here to make sure any filters wouldn't catch it and consider this an adult content blog). Seeing a good first layer is always a wonderful thing, if you're a 3D printer.

Subscribe to:
Posts (Atom)