Sunday, March 17, 2013

15mm Ready to Rebase

I made ~ahem~ a few mistakes when I started basing my 15mm for Lasalle.  The first mistake was basing for Lasalle.  I'm going to be basing for Napoleon's Battles - a classic set of rules with basing that will work with most other rule sets.  The second mistake was not sealing the wooden bases before gluing on the minis.  With wood glue.  These were the causes for the problems that made rebasing a necessity.

I live in a semi-arid climate.  I'm still not used to this on many levels.  Because the bases weren't sealed they absorbed a lot of the water from the glue causing some interesting but unwanted effects with the flock.  I ended up with a stripe all around the edge with no flock.  The other problem was the the whole reason for doing a glue base on top of the main base is so that if the base gets dropped there's a good chance the entire set of minis will pop off with the glue and cause less damage.  This does not work when the wood glue adheres wonderfully to the base.

Removing them was a chore, to say the least.  These are AB minis and have tiny little ankles.  One of the ones waiting to be based is already broken off at the ankles and will be reattached soon enough.  I'm quite proud to say that I removed all 64 minis without breaking any or breaking off the bayonets.  There's some bent bayonets but I won't straighten them out until they're on their final base.


Yes it looks like the terrible aftermath of a battle and in some ways that's what it was.  The pile of wooden pieces to the right are what's left of the original bases.  I couldn't soak them well enough to pry them off the bases without the real potential for damage so I started breaking and peeling the bases from the bottom to pull the support away from them.  I did soak them a few times and the glue did soften up the in the process.  I will give lots of good press for Litko plywood bases.  They didn't want to be destroyed and it took some effort to do so.  I also couldn't use the attached figures as a grip so it was an interesting project for the evening.

I need to get a can of black spray paint to seal the new wooden bases and hope to do that today.  I think I've got enough finished minis for at least 30 infantry bases.  I also need to pick up some storage for them.  Since I need containers that are around 2 inches tall it will be easy enough - that's a standard depth on a lot of them.  I can pick them up in stages since I'm going to get larger containers for these.  I also need to make movement trays and that will help keep them from sliding around in the containers.

As you can tell I'm getting ready to start painting these again.  The goal is to get all the infantry done before changing over to another project.  Mixing it up keeps things interesting.

Tuesday, February 26, 2013

I'm still doing stuff!

I've been doing a lot of painting and not a lot of taking pictures.  I need to correct that.

I've also got an interesting assembly to do since I want to make the ship modular with rare earth magnets and it's not quite designed for that like a simple turret attachment.  The ship is nifty but it looks fragile for transport and kind of tall for my case.  Wish me luck on that one and I'll try to take pictures as I go.

So far I've got most of my Dystopian Wars naval models painted along with a couple of air ships.  I'm leaving the land forces for later.

Pictures soon!  I promise!

Sunday, February 3, 2013

A brief update

I've got almost all the navy Dystopian Wars ships painted.  I'm waiting on a replacement part for the carrier and in the meantime I've failed my roll against temptation for painting the airships that I have.  It's not many and the sky fortress seems to have some good tactical value against Russians.  The gaming group has a lot of Russian fleets.  I'll be posting pictures in batches in the near future.

This is the current state of my table.  I finally found the missing dungeon crawl minis that my friend Michelle is going to be painting for me.  We've done a barter and this means there's a chance that they'll get painted.  I'm only sending her the nasties and not even all of those.  Barter does have its limits.  We haven't done the final negotiations.  I didn't post a picture of the ones that are ready to be painted.

On a final note I'm getting the Hirst Arts kits to make the old WizWar boards.  I bought the wizard minis and I'm looking forward to doing a straightforward build again.  The painting seems to be tedious but I'm thinking it will be a good chance to try my airbrush.  There's also some fun accessories to make.

A quick status shows that I still have 6 1/2 armies to paint (the CoA one I've been painting counts as 1/2 done to me), the dungeon crawl and now WizWar.  Yeah.  Plenty to keep me busy.

Wednesday, December 19, 2012

Dreadnought is done!

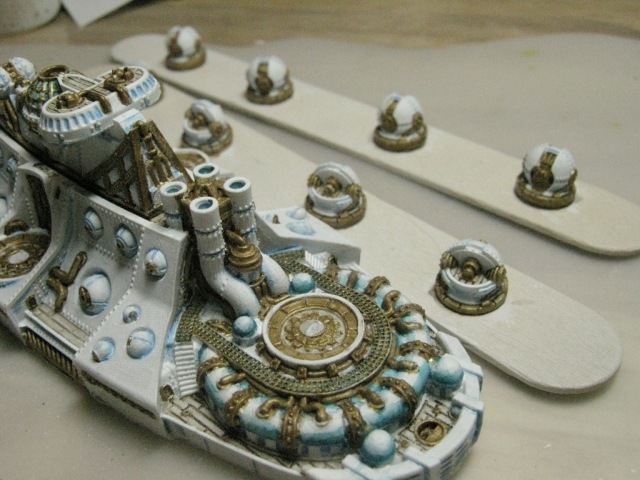
These things might be futzy to paint but they're also quick.  Relatively speaking, that is.   Then again I'm painting to a tabletop level and I'm trying to impress anyone but me.

It may not come across well in the pictures but the ring on the back of the ship and the "windows" on the particle accelerator on the bridge are painted in a blue-green.  Looking at the pictures it seems to be too close to the blue on the rest of the ship but in person it does stand out.

You can see the turrets in the background.  Once I get this one varnished I'll take some pictures with the turrets in place and with some of the escort ships.


Tuesday, December 18, 2012

Dreadnought half way done

I decided to move on to one of the larger ships.  Because they look cool.  Turns out they used all that space to put details everywhere.

This ship has 2 different types of turret - regular ordnance and energy weapons.  I decided to magnetize the turrets so I could swap them out.  I also decided to magnetize the bridge section so it would be shorter.  I was careful but not careful enough.  Of course I screwed up the polarity of one of the magnet pairs.  Luckily it was the bridge so I'll epoxy it down when the ship is painted.  Lesson learned because the battleship can run immersed and the bridge section is put into a clear template.


The plan is to put a wash into the circular part on the bridge and paint the ring in the back to represent Element 270.  Which means blue-green.  Otherwise it's going to be lots of the light blue wash in all the nooks and crannies.

Thursday, December 13, 2012

Ships - Fini!

Gee, once I figured it out these painted up rather quick.  The trick seems to be KISS.  Good painting skills are still essential since brush control is important due to the amount of detail that doesn't get painted.  It makes sense, really.

Step 1 - Base coat and metal

I put a white base coat over everything.  Go with thin coats so the detail doesn't get clogged up.  Then I painted everything that would be metal.  And after that I touched up the white to clean up where the paint went awry.


Step 2 - Brown wash

The deck and the metal was given a brown wash.  The deck got touched up a bit where it dried spotty.  The brown wash also took care of lining those areas that needed it.  The last steps were using the brown wash in the details to make them stand out more and touching up the white.  Again.


Step 3 - Blue shadows

I wanted to do a cool blue-toned white.  That's why the first attempts had blue hulls.  I achieved the same type of effect by using a pale blue in the shadows.  And I touched up the white.


Step 4 - Element 270 (Sturginium)

The fluff has the magic rock as a glowing blue-green.  I wasn't going to do OSL on these so I put a dot of the color in the bottom of the smokestacks.

Monday, December 10, 2012

Ships - I didn't get it

Last night I started work on the hulls. My intent was to bring up the white with washes.  Turns out I was incorrect in my technique.

Once again I have discovered that the ways I paint minis are not suitable for these kind of minis.

I'm going to test the idea of how I'm going to get a shadow on these without having a darker base coat.  Since they will be taking another trip into the Simple Green I can test directly on the minis instead of getting to that point and finding it won't work.

I'm not thrilled about redoing these minis a third time but I also knew that I would be using them as a learning experience.  Oh, I've learned all right.

I'm also going to try changing the deck color to something lighter so the metal stands out.  The one I have now looks great but it's too close to the brass and when they're together nothing stands out.  I have a couple of ideas and I'll test them before I start over.  I'm debating between a very, very light tan or plain white - both with the brown washes.   I think I know which one will look better but I have to try them both to be sure.

On a better note I received my rare earth magnets so I can plan on starting the larger ships once I figure out the painting methods.  I'll be using magnets to hold the airships on the flight stands (removable for storage) and for the alternate weapons available to ships.  I'll probably keep the bridge separate as well since they came that way.  It will also make the ships less prone to damage during transport.

Ah well.  Live and learn.  Then blog about what went wrong so other people can use what I've done.